Suprapunerea Steam este utilizată pentru a accesa Steam în timp ce jucați orice joc. Puteți invita prieteni, trimite mesaje, găsi ghiduri și răspunde la mesaje etc. Puteți vedea, de asemenea, care dintre prietenii dvs. sunt online și îi puteți invita să joace jocul pe care îl jucați. Este un instrument foarte util, deoarece vă permite să accesați Steam în orice joc în loc să schimbați ferestrele pentru a face acest lucru.
Mulți oameni întâmpină o problemă în care suprapunerea Steam nu mai funcționează și sunt lăsați într-o situație strânsă. Nu există o singură soluție pentru această problemă, deoarece problema variază în funcție de configurația hardware și software a utilizatorului. Am enumerat o serie de soluții pe care le puteți testa. Încercați-le într-o descrescătoare și nu omiteți nicio soluție, cu excepția cazului în care vi se solicită.
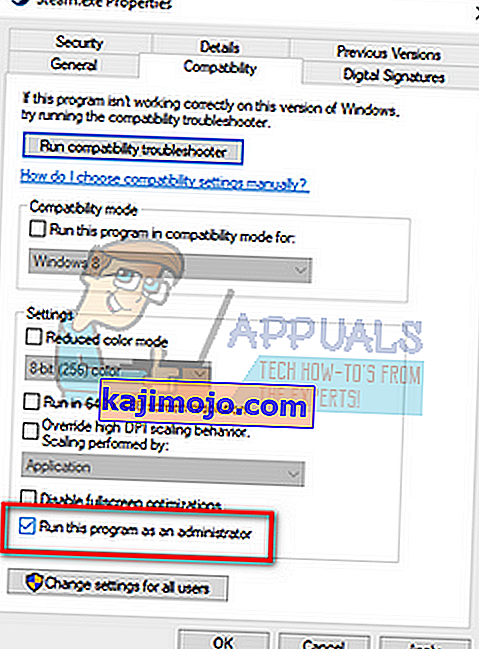
Soluția 1: Acordarea accesului administratorului
Cel mai important motiv pentru care suprapunerea cu abur nu funcționează poate fi faptul că programele nu au acces de administrator. În multe computere, aceasta este opțiunea implicită atunci când instalați Steam. Vom ghida cum să navigați la fișierele executabile și să le acordați permisiunile unui administrator.
- Deschideți-vă directorul Steam. Locația implicită a acestuia este C: \ Program Files (x86) \ Steam. Sau dacă ați instalat Steam într-un alt director, puteți naviga la acel director și veți fi bine să mergeți.
- Găsiți un fișier numit „ Steam.exe ”. Acesta este principalul lansator Steam. Faceți clic dreapta pe el și selectați Proprietăți . Selectați fila Compatibilitate din partea de sus a ecranului. Aici, în partea de jos a ferestrei, veți vedea o casetă de selectare care indică „ Rulați acest program ca administrator ”. Asigurați-vă că este bifat. Salveaza schimbarile si iesi.
- Acum găsiți fișierul numit „ GameOverlayUI.exe ”. Faceți clic dreapta și selectați proprietățile sale . Selectați fila Compatibilitate din partea de sus a ecranului. Aici, în partea de jos a ferestrei, veți vedea o casetă de selectare care indică „ Rulați acest program ca administrator ”. Asigurați-vă că este bifat. Salveaza schimbarile si iesi.

- Reporniți Steam și verificați dacă suprapunerea Steam funcționează în timp ce jucați vreun joc.
- Dacă nu, asigurați-vă că nu rulați jocul respectiv ca administrator, deoarece uneori poate provoca erori.
- Mergeți în folderul jocului, faceți clic dreapta pe executabil și selectați „Properties”.
- În fila de compatibilitate, asigurați-vă că nu este setat să ruleze ca administrator.
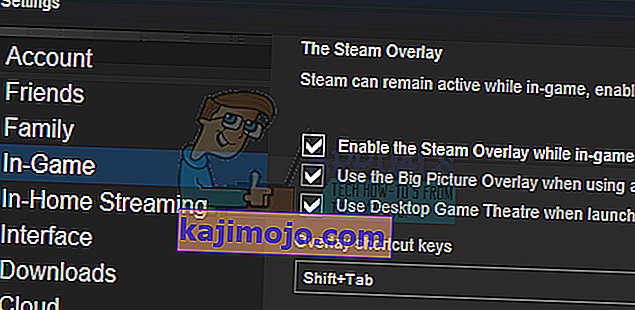
Soluția 2: Activarea Steam Overlay
Există o opțiune în Steam care activează Steam Overlay. Este posibil ca suprapunerea dvs. să nu funcționeze, deoarece opțiunea nu este activată. Putem încerca să-l activăm și să pornim din nou Steam pentru a vedea dacă problema se rezolvă.
- Deschideți-vă clientul Steam.
- Faceți clic pe opțiunea numită Steam prezentă în partea stângă sus a ferestrei. Din caseta derulantă, selectați Setări pentru a deschide interfața Setări.
- Odată ce setările sunt deschise, faceți clic pe fila In-Game prezentă în partea stângă a ecranului. Aici veți vedea o casetă de selectare care indică „ Activați suprapunerea Steam în timpul jocului ”. Asigurați-vă că este bifat. De asemenea, puteți verifica dacă apăsați tastele rapide de suprapunere. Le puteți schimba și dacă doriți.
- Acum faceți clic pe fila Bibliotecă prezentă în partea de sus a ferestrei. Jocurile care sunt instalate pe computerul dvs. vor fi listate aici. Faceți clic dreapta pe jocul în care suprapunerea nu funcționează și selectați Proprietăți.
- Aici veți vedea o altă casetă de selectare care indică „ Activați suprapunerea Steam în timpul jocului ”. Asigurați-vă că este bifat.

- Lansați din nou Steam și verificați dacă suprapunerea funcționează în acel joc dorit.
Soluția 3: deschiderea din folderul principal al jocului
Un alt remediu este să deschideți jocul pe care îl jucați direct din folderul său de instalare. S-ar putea să existe o eroare dacă lansați jocul din lansatorul Steam care dezactivează suprapunerea Steam.
- Deschideți-vă directorul Steam. Locația implicită a acestuia este C: \ Program Files (x86) \ Steam. Sau dacă ați instalat Steam într-un alt director, puteți naviga la acel director și veți fi bine să mergeți.
- Navigați în următoarele foldere
Steamapps
- Acum veți vedea diferite jocuri care sunt instalate pe computer. Selectați jocul în care suprapunerea Steam nu funcționează.
- Când vă aflați în folderul jocului, deschideți folderul numit „ joc ”. Când vă aflați în folder, deschideți un alt folder numit „ bin ”. Acum veți vedea două foldere numite win32 și win64 . Deschideți win32 dacă computerul dvs. are o configurație pe 32 de biți sau win64 dacă are o configurație pe 64 de biți.
Adresa finală ar arăta cam așa.

- Aici veți lansa jocul principal, de exemplu, cum ar fi „dota2.exe”. Faceți clic dreapta pe acesta și selectați opțiunea Executare ca administrator . Când jocul este lansat, verificați dacă suprapunerea Steam funcționează.
Soluția 4: Dezactivarea aplicațiilor terță parte
Aplicațiile terță parte, cum ar fi Fraps sau Razer Synapse, pot cauza probleme atunci când încercați să accesați suprapunerea Steam. Motivul este că aceste aplicații necesită controlul suprapunerii sistemului atunci când rulează. Suprapunerea sistemului / ecranului dvs. este partajată de jocul pe care îl jucați și de aplicația terță parte. Când o altă aplicație (Steam overlay) încearcă să o acceseze, nu poate, deoarece este deja utilizată de alte două părți. Cel mai bun mod este să le dezactivați și să încercați să deschideți din nou Steam overlay când jucați orice joc.
- Puteți fie să închideți singuri aceste aplicații din opțiunile respective, fie să apăsați Windows + R pentru a deschide aplicația Run.
- În caseta de dialog tastați „ taskmgr ” pentru a afișa managerul de activități.
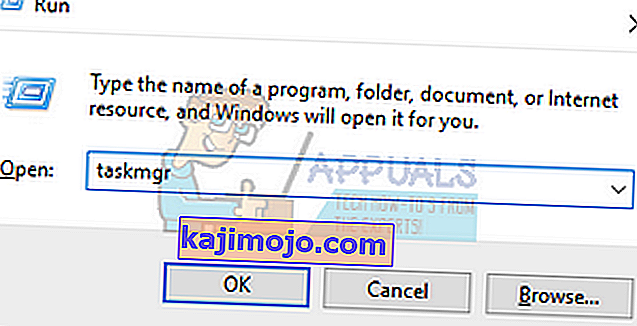
- Acum, din lista de procese, ștergeți toate aplicațiile terță parte care rulează și închideți-le. Lansați din nou Steam și verificați dacă suprapunerea funcționează.
Notă: Puteți încerca, de asemenea, să-l utilizați în modul sigur cu rețeaua și să verificați dacă acest lucru vă rezolvă problema.
Soluția 5: Reporniți computerul
Deși nu pare prea mult, repornirea computerului poate rezolva problema. Este posibil ca Steam-ul dvs. să fie actualizat în fundal și să aibă actualizări instalate. Datorită acestor noi actualizări, se poate întâmpla ca acesta să nu-și îndeplinească funcționalitatea completă (rularea Steam overlay) până când PC-ul nu este repornit pentru a aplica toate modificările prin care a trecut odată cu actualizarea. Reporniți computerul și rulați Steam ca administrator și verificați dacă suprapunerea Steam funcționează atunci când jucați un joc.
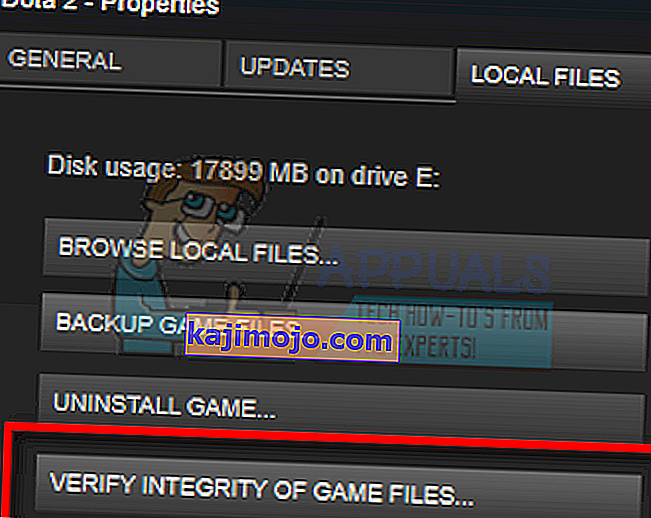
Soluția 6: Verificarea fișierelor de jocuri locale și a fișierelor bibliotecii
It may be the case that your game files may be corrupted or may have some missing game files. Because of this Steam overlay wouldn’t open in your game. Your library files can also be in the incorrect configuration which may lead to a bugged Steam overlay.
- Open your Steam client and click the Library present on the top. Here all your installed games will be listed. Select the game in which Steam overlay fails to open.
- Right-click on the game which is giving you the error and select Properties.
- Once in the properties, browse to the LocalFiles tab and click on the option which says Verify Integrity of Game Files. Steam will then start verifying all the files present according to the main manifest it has. If there is any file missing/corrupted, it will download that files again and replace it accordingly.
- Now navigate to your Settings by pressing the Settings option after clicking Steam present in the bottom left corner of the screen. Once in the Settings, open the Downloads tab present at the left side of the interface.
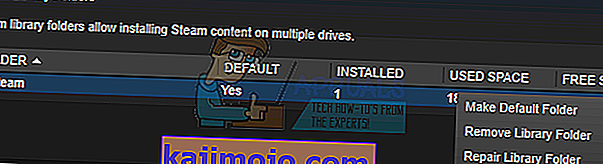
- Here you will see a box in which it is written “Steam Library Folders”. Click it

- All your steam content information will be listed. Right-click on it and select “Repair Library Files”.
- Restart Steam and open it using Run as administrator
Solution 7: Checking your Firewall and Antivirus
It is a very common reality that your firewall and antivirus software conflicts with Steam. Steam has a lot of processes going on at once to ensure that your gaming experience is nothing but the best. However, many antivirus software marks these processes as potential threats and quarantine them resulting in some processes/applications not working. We have put together a guide on how to put steam as an exception in antivirus.
For disabling the Windows Firewall, follow the steps listed below.
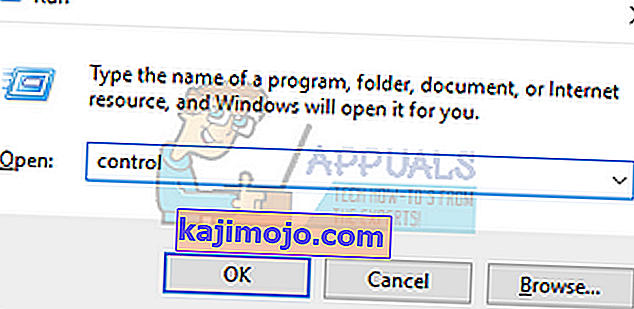
- Press Windows + R button to bring up the Run application. In the dialogue box type “control”. This will open your computer’s control panel in front of you.
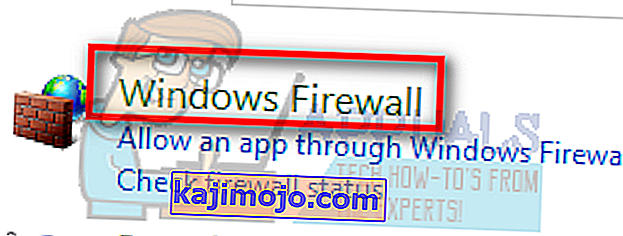
- On the top right there will be a dialogue box to search. Write firewall and click on the first option that comes as a result.
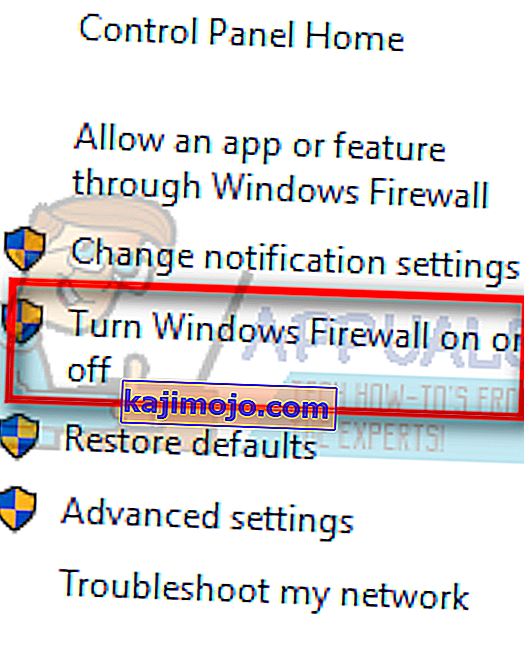
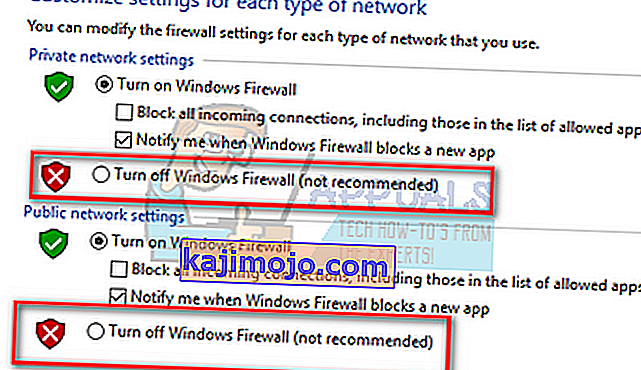
- Now at the left side, click the option which says “Turn Windows Firewall on or off”. Through this, you can turn your firewall off easily.
- Select the option of “Turn off Windows Firewall” on both the tabs, Public and Private Networks. Save changes and exit. Restart Steam and launch it using the option Run as administrator.
Solution 8: Checking for Windows updates
As we all know, Steam keeps its client up to date with all the latest upgrades and developments of any operating system. It adapts its functions and options accordingly. If Steam gets updated for that new change in your OS, and your OS isn’t upgraded on your side, it may cause Steam not to function properly. As a result, your Steam overlay won’t launch when you are playing any game. Follow the steps listed below to check for potential updates and install them accordingly.
- Open your Start menu and in the dialogue box type “Settings”. Click on the first results that come. This will open the Settings application.
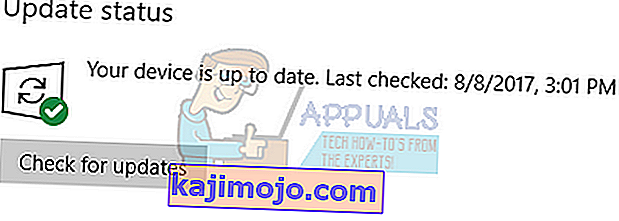
- Once in the Settings application, you will see a number of options. Browse through them until you find the one named “Update and Security”.

- Once in the Update and Security settings, you will see an option that says Check for updates. Click it and Windows will check for the updates available. It will download them and ask before installing them. Then it may require a computer restart. Save your work before restarting. After it has restarted, launch the Steam client using the option of Run as administrator and check whether the Steam overlay is working or not.
Note: You can also check manually for updates if automatic-check fails.
Solution 9: Disabling gameoverlayui.exe
Gameoverlayui.exe is not essential for the Windows OS. Disabling it causes relatively no problems. It is located in the subfolder of C:\Program Files. It signed by Verisign and has no information regarding its developer. It is also not a Windows system file so you don’t have to worry about it causing any unexpected errors. Disabling this process sometimes fixes the issue of Steam overlay not working. Follow the steps listed below to disable it from task manager.
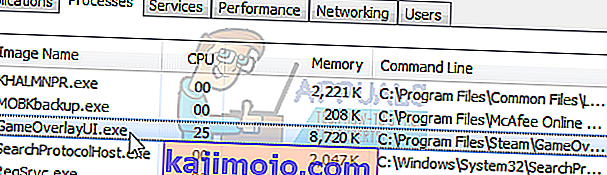
- Press Windows + R button to bring up the Run application. In the dialogue box type “taskmgr” to launch the task manager.
- Browse to processes and scroll until you find the one named “gameoverlayiu.exe”. Disable it and check if the Steam overlay is working. You may have to restart Steam and run it using the Run as administrator option.
Solution 10: Deleting GameoverlayUI
Before we reinstall Steam and its components, it’s worth a shot to delete the GameoverlayUI application and checking the problem gets fixed. Note that you don’t have to delete it permanently. You can always retrieve it using the Recycle Bin.
- Open your Steam directory. The default location of it is C:\Program Files (x86)\Steam. Or if you installed Steam in another directory, you can browse to that directory and you will be good to go.
- Search for “GameOverlayUI.exe”. Delete it. Restart Steam and open it using Run as administrator. Check if the problem gets fixed. If it doesn’t work, you can restore the deleted file from the Recycle Bin.

Solution 11: Enabling Overlay for Specific Game
In certain cases, the overlay might’ve been disabled for one specific game due to which it is not showing up in that game. In order to change this, we will open the properties for that game and change its configurations. For that:
- Launch Steam and sign in to your account.
- Click on “Library” and then right-click on the game with which you are facing this issue.
- Click on the “General” tab and check the “Enable In-Game Overlay” option.
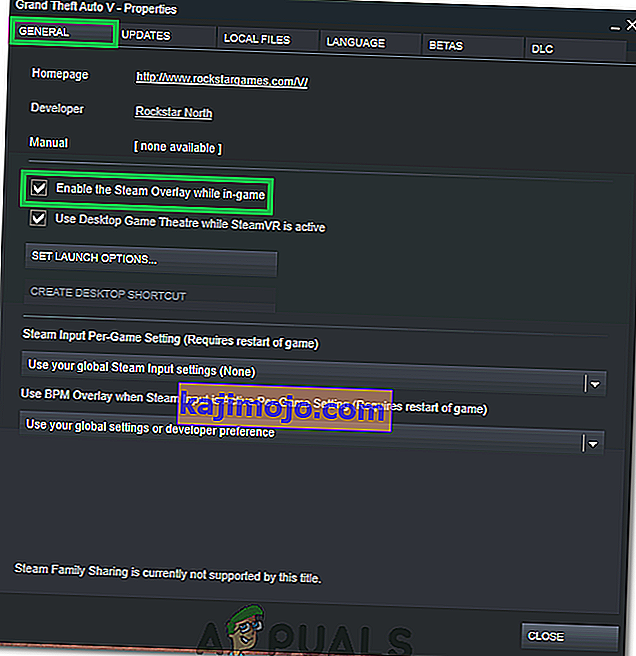
- Check to see if the issue still persists.

Final Solution: Refreshing Steam files
If the error still persists at this stage, we have no choice but to refresh Steam files. Refreshing Steam files will reinstall Steam on your computer again. We will delete some of the configuration folders to ensure that they get renewed upon the installation and all the bad files get removed.
Please note that any interruption during the copy process will corrupt the files and you will have to re-download the entire content over again. Only proceed with this solution if you are sure that your computer won’t be interrupted.
- Navigate to your Steam directory. The default location for your directory is
C:/Program Files (x86)/Steam.
- Locate the following files and folders:
Userdata (folder) Steam.exe (Application) Steamapps (folder- only preserve the files of other games in it)
The user data folder contains all the data of your gameplay. We don’t need to delete it. Furthermore, inside Steamapps, you will have to search for the game that is giving you the problem and only delete that folder. The other files located contain the installation and game files of other games you have installed.
However, if all the games are giving you problems, we suggest that you skip deleting the Steamapps folder and proceed with the following step.

- Delete all other files/folders (except the ones mentioned above) and restart your computer.
- Re-launch Steam using administrator privileges and hopefully, it will start updating itself. After the update is complete, it will run as expected.