Unii utilizatori Windows nu pot căuta și descărca noi actualizări pentru sistemul lor de operare. Cei mai mulți utilizatori afectați raportează că actualizările încep să se descarce, dar procesul nu se finalizează niciodată și se afișează codul de eroare 8024A000 . Conform codului de eroare, această eroare apare atunci când Windows Update încearcă să împiedice întreruperea unei sesiuni de actualizare în timp ce efectuează o sarcină importantă. Problema nu este exclusivă pentru o anumită versiune de Windows, deoarece se raportează că apare pe Windows 10, Windows 8.1 și Windows 7.

Ce cauzează codul de eroare Windows Update 8024A000?
Am investigat această problemă specială analizând diferite rapoarte ale utilizatorilor și analizând câteva dintre cele mai populare remedieri pentru acest cod de eroare. După cum se dovedește, există mai mulți vinovați potențiali care ar putea ajunge să declanșeze această problemă:
- Windows Update problemă - Această problemă poate apărea din cauza unei probleme recurente WU. În anumite circumstanțe, componenta de actualizare va rămâne blocată și nu va putea instala nicio nouă actualizare în așteptare. În acest caz, instrumentul de depanare Windows Update ar trebui să poată rezolva problema automat după aplicarea strategiilor de reparații aplicabile.
- Serviciul de actualizare Windows este blocat într-o stare limbo - După cum se dovedește, această problemă poate apărea și dacă unul sau mai multe servicii Windows nu sunt pornite sau oprite. Dacă acest scenariu este aplicabil, ar trebui să puteți rezolva problema utilizând un prompt CMD ridicat pentru a opri și a reporni cu forță fiecare serviciu implicat.
- DLL-urile asociate WU nu sunt înregistrate corect - Windows Update se bazează pe zeci de fișiere Dynamic Link Library atunci când caută și instalează actualizări în așteptare. În acest caz, ar trebui să puteți rezolva problema reînregistrând DLL-urile aferente dintr-o fereastră de comandă de comandă ridicată.
- Corupția fișierelor de sistem - Corupția fișierelor de sistem poate fi, de asemenea, responsabilă pentru acest mesaj de eroare. Odată ce un singur fișier corupt poate rupe efectiv întreaga componentă WU. Dacă acest scenariu este aplicabil, ar trebui să puteți rezolva problema utilizând un Verificator de fișiere de sistem sau DISM pentru a repara fișierele corupte.
- Driverul RST lipsește din instalarea Windows - Această problemă specială poate apărea și în cazul în care computerului îi lipsește driverul Rapid Storage Technology sau dacă folosește o versiune sever depășită. Mai mulți utilizatori afectați au reușit să rezolve problema instalând cea mai recentă versiune a driverului RST.
- AV terță parte închide porturile utilizate de Windows Update - Se pare că unele instrumente AV terțe sunt atât de supraprotectoare încât au tendința de a închide porturile legitime utilizate de Windows Update. McAfee Total Protection, AVAST și Comodo sunt în fruntea acestei liste, dar ar putea exista și altele. În acest caz, ar trebui să puteți rezolva problema dezinstalând suita terță parte și utilizând soluția încorporată (Windows Defender).
Dacă vă luptați în prezent pentru a rezolva acest mesaj de eroare, acest articol ar trebui să vă indice în direcția corectă. Mai jos, veți descoperi câteva soluții potențiale pe care alți utilizatori într-o situație similară le-au folosit cu succes pentru a rezolva această problemă.
Pentru a rămâne cât mai eficient posibil, vă sfătuim să urmați metodele de mai jos în ordinea în care sunt prezentate și să renunțați la acei pași care nu se aplică scenariului dvs. În cele din urmă, ar trebui să descoperiți o soluție care va rezolva problema în cazul dvs. particular, indiferent de vinovatul care o cauzează.
Metoda 1: Rularea instrumentului de depanare Windows Update
Dacă întâmpinați această problemă, ar trebui să începeți prin rularea instrumentului de depanare Windows Update. Mai mulți afectați au reușit să rezolve problema forțând instrumentul de depanare Windows Update să remedieze automat codul de eroare 8024A000.
Mai mulți utilizatori afectați au raportat că problema a fost rezolvată după ce au rulat instrumentul de depanare Windows Update și au repornit computerul. Este posibil ca versiunea dvs. Windows să includă o strategie de reparații pentru această eroare specială. Dacă da, instrumentul de depanare va aplica automat strategia de reparații și veți putea remedia problema în doar câteva clicuri.
Iată un ghid rapid despre rularea instrumentului de depanare Windows Update:
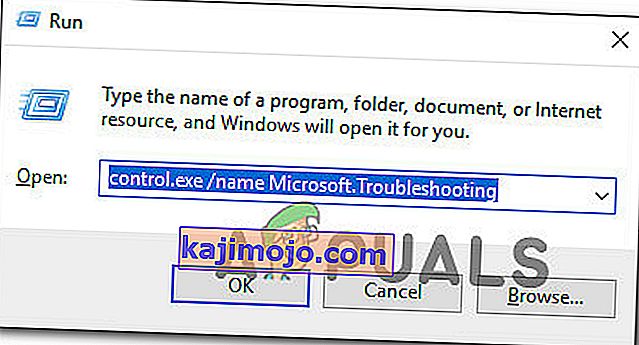
- Apăsați tasta Windows + R pentru a deschide o casetă de dialog Executare . Apoi, tastați „ control.exe / nume Microsoft.Depanare ” în caseta de text și apăsați Enter pentru a deschide fila Depanare a aplicației Setări .
- Odată ce vă aflați în fila Depanare, derulați în jos până la fila Pregătire și rulare și faceți clic pe Windows Update . Apoi, din meniul nou apărut, faceți clic pe Rulați instrumentul de depanare .
- Așteptați până la finalizarea scanării inițiale, apoi faceți clic pe Aplicați această remediere dacă se găsește o strategie de reparații viabilă.
- Dacă o soluție este implementată, reporniți computerul și vedeți dacă problema este rezolvată odată ce următoarea secvență de pornire este finalizată.

Dacă același cod de eroare 8024A000 apare încă atunci când încercați să instalați o actualizare Windows, treceți la următoarea metodă de mai jos.
Metoda 2: Repornirea serviciilor Windows Update
După cum se dovedește, această problemă specială poate apărea și din cauza unui serviciu Windows Update care se blochează într-o stare limbo (nu este nici pornit, nici oprit). Mai mulți utilizatori afectați au raportat că au reușit să rezolve problema prin repornirea fiecărui serviciu utilizat de componenta WU (Windows Update).
S-a confirmat că această procedură este eficientă pentru fiecare versiune recentă de Windows (Windows 7.1, Windows 8.1 și Windows 10)
Iată un ghid rapid despre cum să faceți acest lucru:
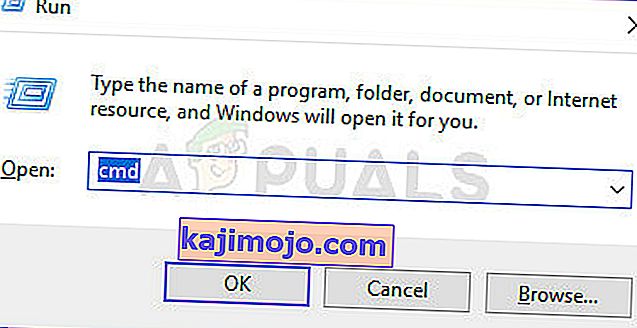
- Apăsați tasta Windows + R pentru a deschide o casetă de dialog Executare . În ecranul următor, tastați „cmd” în caseta de text și apăsați Ctrl + Shift + Enter pentru a deschide un prompt de comandă ridicat. Când vi se solicită UAC (Control cont utilizator) , faceți clic pe Da pentru a acorda privilegii administrative.
- După ce vă aflați în promptul CMD ridicat, tastați următoarele comenzi în ordine și apăsați Enter după fiecare pentru a reporni fiecare serviciu Windows Update:
net stop wuauserv net stop bits net stop cryptsvc
- Odată ce serviciul WU a fost oprit, tastați următoarele comenzi și apăsați Enter după fiecare pentru a reporni serviciile:
net start wuauserv net start bits net start cryptsvc exit
- Odată ce procedura este finalizată, reporniți computerul și vedeți dacă problema este rezolvată odată ce următoarea secvență de pornire este finalizată.

Dacă același cod de eroare 8024A000 apare încă atunci când încercați să instalați o actualizare Windows în așteptare, treceți la următoarea metodă de mai jos.
Metoda 3: Reînregistrarea DLL-urilor asociate cu Windows Update
După cum se dovedește, este, de asemenea, posibil ca motivul pentru codurile de eroare 8024A000 constante să fie un fișier DLL (Dynamic Link Library) care nu mai este înregistrat corect. Acest lucru este raportat în mod obișnuit în versiunile mai vechi de Windows și apare de obicei din cauza corupției sau după ce un scaner de securitate pune în carantină unele elemente din cauza unei infecții cu virus.
Dacă acest scenariu este aplicabil situației dvs. actuale, iată un ghid rapid cu privire la modul în care puteți reînregistra DLL-urile aferente WU (Windows Update) pentru a remedia codurile de eroare 8024A000:
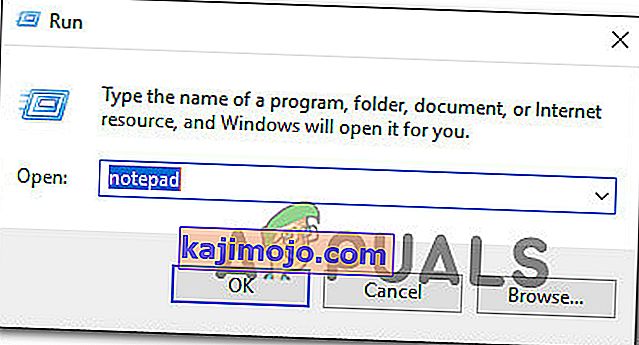
- Apăsați tasta Windows + R pentru a deschide o casetă de dialog Executare . Apoi, tastați „notepad” în caseta de text și apăsați Ctrl + Shift + Enter pentru a deschide o fereastră Notepad cu acces ridicat. Când vi se solicită UAC (Control cont utilizator)
- În noul document Notepad, lipiți următoarele comenzi:
regsvr32 c:\windows\system32\vbscript.dll /s regsvr32 c:\windows\system32\mshtml.dll /s regsvr32 c:\windows\system32\msjava.dll /s regsvr32 c:\windows\system32\jscript.dll /s regsvr32 c:\windows\system32\msxml.dll /s regsvr32 c:\windows\system32\actxprxy.dll /s regsvr32 c:\windows\system32\shdocvw.dll /s regsvr32 wuapi.dll /s regsvr32 wuaueng1.dll /s regsvr32 wuaueng.dll /s regsvr32 wucltui.dll /s regsvr32 wups2.dll /s regsvr32 wups.dll /s regsvr32 wuweb.dll /s regsvr32 Softpub.dll /s regsvr32 Mssip32.dll /s regsvr32 Initpki.dll /s regsvr32 softpub.dll /s regsvr32 wintrust.dll /s regsvr32 initpki.dll /s regsvr32 dssenh.dll /s regsvr32 rsaenh.dll /s regsvr32 gpkcsp.dll /s regsvr32 sccbase.dll /s regsvr32 slbcsp.dll /s regsvr32 cryptdlg.dll /s regsvr32 Urlmon.dll /s regsvr32 Shdocvw.dll /s regsvr32 Msjava.dll /s regsvr32 Actxprxy.dll /s regsvr32 Oleaut32.dll /s regsvr32 Mshtml.dll /s regsvr32 msxml.dll /s regsvr32 msxml2.dll /s regsvr32 msxml3.dll /s regsvr32 Browseui.dll /s regsvr32 shell32.dll /s regsvr32 wuapi.dll /s regsvr32 wuaueng.dll /s regsvr32 wuaueng1.dll /s regsvr32 wucltui.dll /s regsvr32 wups.dll /s regsvr32 wuweb.dll /s regsvr32 jscript.dll /s regsvr32 atl.dll /s regsvr32 Mssip32.dll /s
- Once you pasted the commands, go to File (from the ribbon menu at the top) and click on SaveAs.
- From the Save As window, name the file whatever you want but make sure to set the extension of the File Name to .bat. We saved it WindowsUpdateRegister.bat. Then, select a convenable location and click on Save.
- Double-click on the newly created BAT file and click Yes at the confirmation prompt. If you’re also prompted by the UAC (User Account Control) click Yes to grant admin access.
- Once the DLL files have been re-registered, restart your computer and see if the issue has been resolved once the next startup sequence is complete.


If the 8024A000 issue is still occurring, move down to the next method below.
Method 4: Performing SFC and DISM Scans
This particular issue can also occur due to some degree of system file corruption. Although the issue is less common on Windows 10, it’s still possible to get this error code due to some corrupted system file even if you’re system is up to date.
Both DISM (Deployment Image Servicing and Management) and SFC (System File Checker) are built-in utilities capable of repairing system files. The only difference is they do it in different ways.
While SFC scans and repairs system files by replacing corrupted files with locally stored copies, DISM relies on Windows Update to fix corruption. That’s why it’s important to start this procedure with the SFC scan – if WU has a corruption problem, the System File Checker should resolve it, allowing you to use DISM effectively.
Here’s a quick guide on running an SFC and DISM scan from an elevated Command Prompt:
- Press Windows key + R to open up a Run dialog box. Then, type “cmd” inside the text box and press Ctrl + Shift + Enter to open up an elevated Command Prompt. When you’re prompted by the UAC (User Account Control), click on Yes to grant administrative privileges.
- Once you’re inside the elevated Command Prompt, type the following command and press Enter immediately to start the SFC scan:
sfc /scannow
Note: Keep in mind that once you start this process, there’s no way to stop it without running the risk of producing even more disk errors. Be patient and don’t close the CMD window or attempt to restart your computer.
- When the procedure is complete, you can safely close the elevated command prompt and restart your computer to see if the issue has been resolved at the next system startup.
- If the same issue is still occurring even after you’ve performed the SFC scan, follow step 1 again to open another elevated Command Prompt. Then, type the following command and press Enter to perform a DISM scan:
DISM /Online /Cleanup-Image /RestoreHealth
Note: DISM requires a stable Internet connection in order to be able to download fresh copies of the files that are affected by corruption.
- Once the scan is finished, perform one final restart and check if the issue has been resolved once the next startup sequence is complete.
Method 5: Instaling the Intel Rapid Storage Technology Driver (if applicable)
Another possible culprit that might end up causing the 8024A000 error code is a missing our updated Intel Rapid Storage Technology Driver. Several affected users have reported that the issue was no longer occurring after they installed the latest version of this driver and restarted their computer.
Based on our investigations, this scenario is mostly reported to occur in instances where the user is encountering the issue on Windows 7 or below. If this is applicable, follow the steps below to install the latest driver of Intel Rapid Storage:
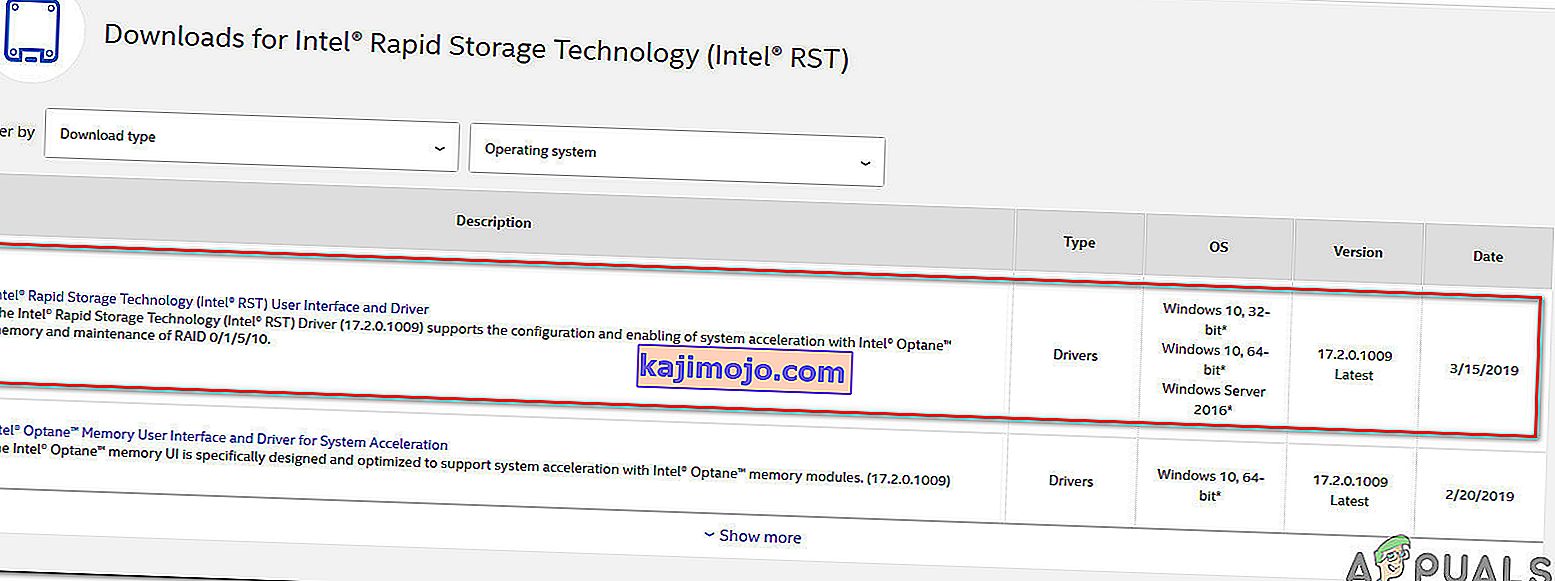
- Visit this link (here) and click on Intel Rapid Storage Technology *RST) User Interface and Driver to initiate the download.
- Once the download is complete, open the installation executable and follow the on-screen prompts to complete the installation of the latest RST driver.
- Restart your computer once the driver is installed and see if the issue has been resolved once the next startup sequence is complete.

If you’re still encountering the 8024A000 Error Code, move down to the next method below.
Method 6: Uninstalling 3rd party AV
As it turns out, it’s also possible that the issue is actually being caused by an overprotective 3rd party AV suite. Several affected users have reported that the issue was resolved after they uninstalled the 3rd party security scanner and reverted back to the default AV (Windows Defender).
McAfee Total Protection, AVAST, and Comodo are commonly reported as being responsible for causing the 8024a000. Users are speculating that the issue occurs because the AV ends up blocking some ports that are actually being used by the WU component.
UPDATE: Based on several user reports, this issue can also be caused by the premium version of Malwarebytes. If you’re using a premium subscription for Malwarebytes, you should be able to resolve the issue by disabling Ransomware protection from the Settings menu.
If you’re suspecting that your third-party AV/firewall is causing the issue, follow the steps on this article (here) to completely uninstall your AV suite without leaving any remnant files.
If this scenario is not applicable or the issue is still occurring even after you’ve uninstalled your 3rd party AV suite, move down to the next method below.
Method 7: Performing a repair install
If none of the methods above have helped you to resolve the issue, a repair install should end up repairing the Windows Update problems. This procedure will reset all Windows components, including booting-related processes.
However, it does things a bit more efficiently than a classic clean install in the sense that it allows you to keep all personal data including photos, videos, applications, and games). The only thing that will get deleted and replace are all Windows components – which is exactly what you need.
In case you want to go for a repair install, you can follow the instructions on this article (here) for step by step instructions on how to do this efficiently.