IAStorDataSvc is the name of the service translated as Intel Storage Data Service used by the Intel Rapid Storage Technology, which comes installed by default on most of the newer operating systems. This process is not harmful and it is meant to provide you faster access to your frequently used programs and applications by automatically saving them to your SSD (if you have one) while retaining access to your Hard Disk Drive’s Capability. In short, it enables you to use both the SSD and the HDD. Intel’s Rapid Response Technology, which is a feature of Intel’s Rapid Storage Technology, works like a master-slave, database for faster access. This is mostly used in Enterprise and Server scenarios, therefore uninstalling it or not using it will be fine for a home-user. SSD’s themselves are pretty fast whether in small capacity or large.

Now since we know what they do; and the choice is ours whether to keep it or lose it, the questions are why is IAStorDataSvc consuming CPU more then it should; this is because the technology will save to. It caches your frequently used programs, and there’s a lot to it such as it may be building its cache index, clearing cache or upgrading cache, to save any new information. It has also been reported by some users that the intel rapid storage app might cause blue screen in some cases. If you decided to keep it, then let this process run for a couple of hours and if it still won’t fix it, then uninstall it and re-install. If you decided to uninstall it or stop the process then that is easy to do.
I decided to keep it, so how do I fix the High CPU Usage?
Method 1: Uninstall Intel Rapid Storage Technology
Hold the Windows Key and Press R. Type appwiz.cpl and Click OK.

In the list of installed programs, locate Intel Rapid Storage Technology, double click on it and choose Uninstall.

After it has been uninstalled, reboot your computer and come back to this page. (bookmark it). Now, Click Here to go to the download page for Intel Rapid Storage Technology, choose your operating system to have the downloads for your version of Windows listed, download it, run it and install it. That should fix the issue.

You can also hop over to the manufacturer’s site for your system to get the driver’s if you cannot figure out which one to use, the manufacturers download section for your product should list them specifically since they know how the system is configured.
Method 2: Stop Intel Rapid Technology Service
Each process that runs on your computer and almost every system application installed on the system has its own service running in the background that facilitates its launch on the operating system. Therefore, in most cases, stopping the service associated with the program can prevent it from running on the computer. In this step, we will be stopping this service and then we will check to see if doing so fixes the issue. For that:
- Press “Windows” + “R” to open the Run prompt.
- Type in “Services.msc” and press “Enter” to launch the service management window.

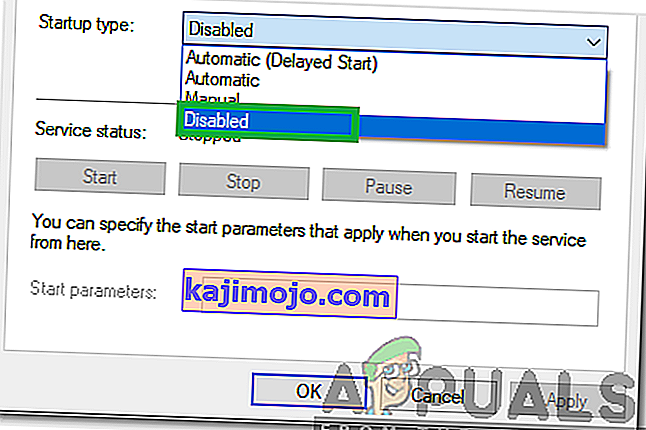
- In the service management window, right-click on the “IAStorDataSvc” or “Intel Rapid Storage Service” from the list of installed services and select the “Properties” option.
- In the service properties, click on the “Startup Type” dropdown and select “Disabled” from the list.

- Click on the “Stop” button to prevent the service from running and then click on the “Apply” button.
- Click on “OK” and close out of the window.
- Now, check to see if the high usage from the application comes back.
Method 3: Perform a System Scan
In certain situations, it is possible that your system has been infected by malware or a virus attack. Some viruses, disguise themselves under the names of system applications so that they are not easily detected by manual checking and so that they can run in the background without interruption from the user. Therefore, in this step, we will be performing a system check using the Default Windows Defender and check if anything is wrong.
- Press “Windows” + “I” to open the settings.
- Click on the “Update and Security” option to launch the security settings.

- In the security settings, click on the “Windows Security” from the left side.
- In Windows Security, click on the “Virus and Threat Protection” from the main screen.
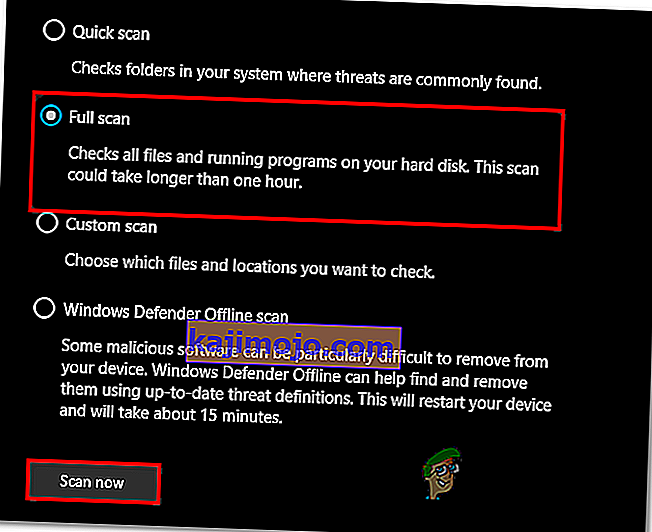
- In the next window, click on the “Scan Options” button and then check the “Full Scan” option.

- Click on the “Scan Now” button to initiate the scan and let the Windows Defender go through the system files to find any failures.
- Wait for the scan to finish and then check to see if it finds any deformities on your computer.
Method 4: Run an Antivirus Scan
It is possible that the default Windows Defender might not have acquired all the latest virus definitions and updates that are needed to properly isolate viruses and malware on your computer. Therefore, in this step, we will be using the Microsoft Security Scanner to check for any viruses on our computer. For that:
- Launch your browser and navigate to this link.
- Download the version of the application that matches the architecture of your operating system.

- After the download finishes, run the executable and let it run a scan on your computer.
- Follow the on-screen instructions to complete the scan and check to see if the issue still persists.
Method 5: Change Bios Settings
In certain situations, the issue might be fixed by reconfiguring some settings from the computer’s bios. The Bios controls the mode in which your storage devices function and if a certain mode has been selected which isn’t properly compatible with the hardware installed on your computer, this high CPU usage might be seen while trying to use it. In order to fix this:
- Restart your computer and wait for it to completely turn off.
- When the computer starts booting up, press the “DEL”, “F12”, or the “F11” keys to get into the computer’s Bios depending upon your motherboard.
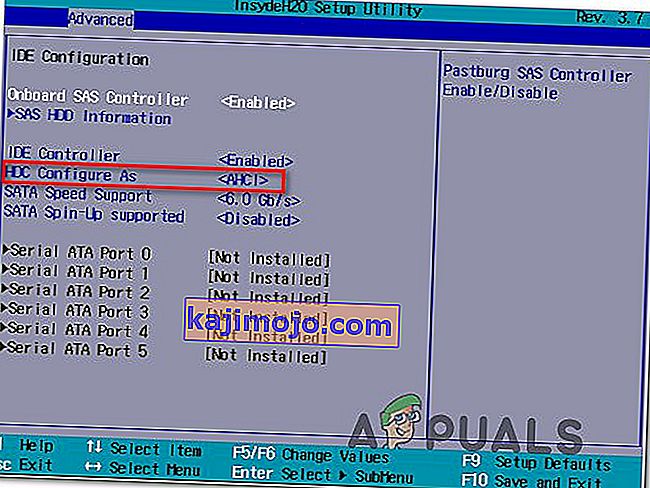
- Once in the Bios, navigate to the Storage section and look for the “Configure SATA As” or “SATA Mode” option.
- Click on this option and select the “AHCI” mode from the list.

- Save the changes that you have made inside your Bios and restart your computer.
- Upon booting into the Windows, check to see if making this change fixes the situation.
Method 6: Ending From The Task Manager
A rather simple but temporary workaround to this issue is to just end the process from the Task Manager if it starts using a lot of resources on your computer. However, keep in mind that this doesn’t prevent the process from coming back and the fix might just be temporary. For that:
- Press “Windows’ + “R” to launch the Run prompt.
- Type in “taskmgr” and press “Enter” to launch the Task Manager.

- In the Task Manager, click on the “Processes” window and select the “Intel Rapid Storage Technology” process from the list which is using a lot of resources.
- After selecting the process, click on the “End Task” button to prevent the Task from being run.
- Check to see if doing so fixes the issue.
Method 7: Installing Older Driver
Most people that encountered this issue on their computers noticed that it only started popping up after they installed an update on their computer. Therefore, in this step, we will be uninstalling the current installation of the driver and reinstall an older version of it from the Intel website. In order to do this:
- Press “Windows” + “R” to open the Run prompt.
- Type in “devmgmt.msc” and press “Enter” to launch the device management window.

- In the device manager, click on the Storage Controller option to expand it and right-click on the “Intel Rapid Storage Technology” driver.
- Select the “Uninstall Device” button to remove the driver from your computer.

- Make sure to follow the on-screen prompts to complete the uninstallation process of the driver.
- After uninstalling, open your browser and navigate to this site.
- On this site, click on the “Show More” option to provide some recently published driver updates from intel.
- Download an older version of the driver for the proper architecture of your Windows.
- After the download finishes, run the executable and follow the on-screen instructions to install it on your computer.
- Check to see if doing so fixes the issue on your computer.
Method 8: Check for Windows Update
A Windows Update might just be the solution for you as most updates bring major bug fixes and patches that ultimately should improve the performance on your computer. Therefore, checking for a Windows Update seems like a decent thing to do if you are running into this issue because Microsoft and Intel are aware of this particular problem and might be working to fix it in a recent update. In order to check for updates:
- Press “Windows’ + “I” to open the settings.
- In the settings, click on the “Update and Security” option and then select the “Windows Update” button from the left side.

- Click on the “Check for Updates” option and let the operating system check for any missing updates on your computer.
- Check to see if the issue is fixed after applying an update.
I decided to uninstall it, how do I do that?
Hold the Windows Key and Press R. Type appwiz.cpl and Click OK. In the list of installed programs, locate Intel Rapid Storage Technology, double click on it and choose Uninstall. This should uninstall it, and stop the process from running. You can also disable just the service, but it would be best to uninstall it since it can be re-installed whenever you want.
Note: After uninstalling, also make sure to clear out the junk files to get rid of any residue from the application.


