Windows 10 este una dintre cele mai așteptate versiuni de Windows de către Microsoft. Deși, Windows 8 a creat o nouă tendință în lumea sistemului de operare desktop, acesta a avut unele probleme în ceea ce privește designul și performanța, care au fost accentul principal pentru Microsoft în Windows 10. Deci, Windows 10 Final Build a fost dezvăluit pe 29 iulie 2015, pentru Desktop ca precum și smartphone-urile.
Acesta a inclus o mulțime de modificări, ținând cont de defectele Windows 8. De fapt, este o versiune avansată a Windows, dar totuși, există o serie de consecințe care apar în fiecare zi cu utilizatori diferiți.
O parte majoră a acestor consecințe sunt erorile care apar atunci când încercăm să îndeplinim o anumită sarcină. Un număr de persoane au primit un mesaj de eroare în timp ce încercau să deschidă diferite software-uri și browsere din Windows 10. Această eroare vine cu un mesaj de eroare care spune că aplicația nu a putut porni corect (0xc0000005). Faceți clic pe OK pentru a închide aplicația . Această eroare apare de obicei cu browserele de internet, dar nu se limitează la acestea. Orice aplicație din Windows nu mai poate răspunde din cauza acestei erori. Deci, trebuie să fie reparat pentru a readuce acele software-uri esențiale la lucru.

11.11.2016: Utilizatorii au raportat că metodele enumerate mai jos vor funcționa și pe Windows 7.
Motiv din spatele erorii Windows 10 0xc0000005:
Există o serie de motive cunoscute care determină această eroare să perturbe operațiunile diferitelor programe software din Windows 10. Unul dintre aceste motive care sunt considerate ca fiind o cauză majoră este un program antivirus terță parte care provoacă conflicte cu fișierele executabile și influențează operațiunile acestora. Pe de altă parte, registrele pot fi corupte din cauza malware-ului și a virușilor care determină comportamentul anormal al programelor. Uneori, driverele hardware defecte pot fi, de asemenea, vinovate de această eroare.
Soluții pentru remedierea erorii 0xc0000005 din Windows 10:
Pe baza motivelor menționate mai sus, soluțiile sunt simple. Deci, parcurgeți următoarele metode pentru a scăpa de acest mesaj de eroare frustrant.
Reparați fișierele de sistem corupte
Descărcați și rulați Restoro pentru a scana și restaura fișierele corupte și lipsă de aici , după ce ați terminat, continuați cu soluțiile de mai jos. Este important să vă asigurați că toate fișierele de sistem sunt intacte și nu sunt corupte înainte de a continua cu soluțiile de mai jos.
Metoda # 1: Fixarea programului antivirus
Programele antivirus pot influența fișierele executabile ale mai multor programe. Deci, pentru a remedia această problemă, vi se cere să dezactivați programul antivirus terță parte pentru a verifica dacă acesta a fost sau nu vinovatul. Vă rugăm să rețineți că dezactivarea programelor antivirus poate duce la unele amenințări grave pentru computerul dvs. atunci când sunteți conectat la internet.
De asemenea, vă puteți baza pe propriul software de securitate Windows, adică Windows Defender . Are aceeași funcționalitate ca a oricărui alt antivirus. Puteți dezactiva antivirusul navigând la Setări și oprind scutul.

După ce este dezactivat, verificați din nou eroarea. Dacă persistă, treceți la următoarea metodă.
Metoda # 2: Fixarea registrelor
Registrul este baza de date centrală a Windows , care este în mod constant folosit de PC - ul pentru a ajuta - l citi mai multe fișiere și setări diferite care are nevoie pentru a rula. Registrele pot fi corupte din cauza deteriorării anumitor fișiere necesare pentru a stiva totul la locul lor. Prin urmare, majoritatea experților vă recomandă să vă asigurați că faceți o copie de rezervă a registrului și să păstrați această copie de rezervă stocată pe un stick USB convențional, astfel încât să puteți revigora registrul în starea anterioară în caz de corupție. Dar, dacă nu ați făcut backup pentru registru, urmați acești pași pentru a remedia registrele, pentru a rezolva eroarea 0xc0000005 .
1. Descărcați software-ul curat de registre de pe acest link .
2. După ce este descărcat, instalați-l folosind setările recomandate. Deschideți software-ul după terminarea procesului de instalare.
3. În interfață, faceți clic pe fila Registru prezentă în panoul din stânga și faceți clic pe butonul etichetat ca Scanare pentru probleme . Va începe să caute erori în registru și, atunci când căutarea va fi terminată, va fi activat un buton Remediați problema selectată . Faceți clic pe butonul respectiv și totul va fi remediat.

Metoda # 3: Remedierea driverelor defecte
Driverele sunt programele software care ajută computerul să comunice cu hardware-ul atașat acestuia. Deci, atunci când sunt deteriorate, hardware-ul tinde să provoace erori . Remedierea acestor scafandri defecțiți vă poate ajuta în mai multe moduri. Urmați pașii de mai jos.
1. Deschideți Device Manager prin apăsarea Win + X și selectând - o din listă.
2. În interiorul Managerului de dispozitive, derulați în jos pentru a vedea dacă există hardware cu semn galben. Dacă există, faceți clic dreapta acolo și selectați Actualizare software driver . Dacă ați instalat drivere recent, reinstalați și aceste drivere.

3. În fereastra care apare după, faceți clic pe Căutare automată pentru software-ul driverului actualizat pentru a-l permite să caute și să instaleze driverele automat. În cazul în care, dacă ați descărcat manual driverele, faceți clic pe opțiunea de mai jos pentru a le răsfoi și a le instala. După terminarea procesului, verificați eroarea.

Metoda # 4: Remediați BCD
Această metodă trebuie să fie realizată de către utilizatori pe propria răspundere. Acest lucru a funcționat pentru unii și nu pentru unii. De asemenea, va trebui să reactivați Windows după efectuarea pașilor din acest ghid.
- Țineți tasta Windows și apăsați X . Alegeți Promptul de comandă (Administrator)
- Tastați „ bcdedit” și apăsați ENTER. Dacă calea Windows Boot Loader este xOsload.exe, atunci trebuie să eliminați câteva fișiere și să reparați BCD-ul. Puteți vedea acest lucru în câmpul PATH după ce ați executat comanda „ bcdedit”.
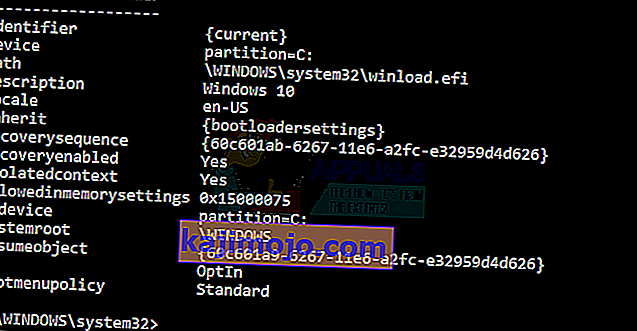
- După ce ați terminat, executați următoarele comenzi de mai jos, unele pot reveni nu au fost găsite, dar ignoră erorile și continuă până la ultima. Asigurați-vă că apăsați tasta ENTER după fiecare comandă.

Del D: \ Windows \ System32 \ xOsload.exe Del D: \ Windows \ System32 \ xNtKrnl.exe Del D: \ Windows \ System32 \ Drivers \ oem-drv64.sys attrib c: \ boot \ bcd -h -r -s ren c: \ boot \ bcd bcd.old bootrec / rebuildbcd
Metoda 5: Verificarea actualizărilor Windows
Actualizările Windows conțin adesea remedieri pentru unele bug-uri și erori, dar sunt, de asemenea, cunoscute pentru că dau loc noilor probleme pe computerele oamenilor. Cu toate acestea, în acest pas, vom verifica dacă există actualizări pentru sistemul dvs. de operare, deoarece Microsoft corectează adesea orice problemă care vine din actualizările lor. Pentru a face acest lucru, urmați ghidul de mai jos.
- Apăsați „Windows ' + „ I ” pentru a deschide setările Windows.
- În setări, faceți clic pe opțiunea „Actualizări și securitate” și din partea stângă, selectați opțiunea „Actualizare Windows” .

- În ecranul următor, faceți clic pe opțiunea „Căutați actualizări” și va solicita automat Windows să verifice dacă există actualizări disponibile.
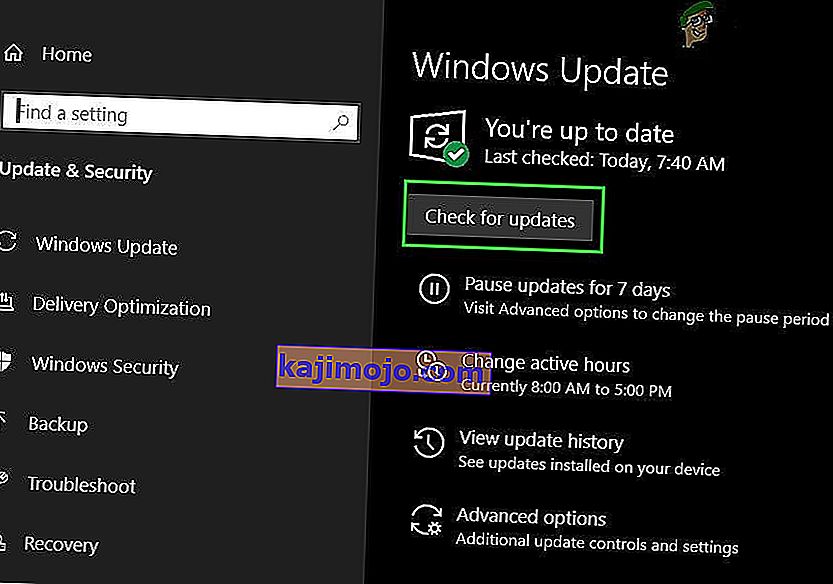
- După finalizarea verificării actualizărilor, faceți clic pe butonul „Descărcați” pentru a declanșa descărcarea și instalarea de noi actualizări pe computer.
- După instalarea acestor actualizări, verificați dacă ați rezolvat problema pe computer.


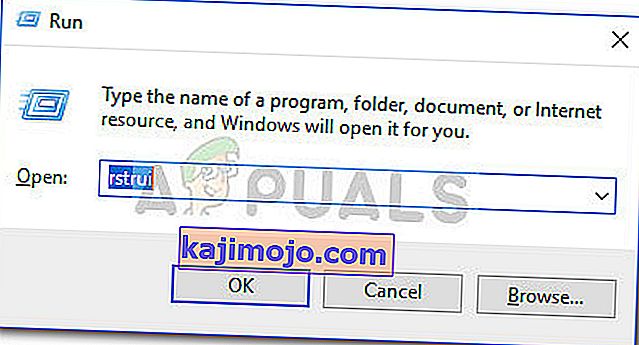
Metoda 6: Restaurarea computerului
Dacă tocmai ați început să primiți această problemă, s-ar putea să se declanșeze din cauza unei instalări defectuoase a driverului sau chiar din cauza unei aplicații necinstite pe care este posibil să o fi instalat recent pe computer. Prin urmare, în acest pas, vom reveni la starea computerului la o dată anterioară și, sperăm, acest lucru ar trebui să rezolve problema noastră dacă s-a datorat motivelor menționate mai sus. Pentru a face acest lucru:
- Apăsați „Windows” + „R” pentru a deschide solicitarea Run.
- Tastați „rstrui” și apăsați „Enter” pentru a deschide fereastra de gestionare a restaurării.
- Faceți clic pe „Next” și bifați opțiunea „Show more Restore Points” .
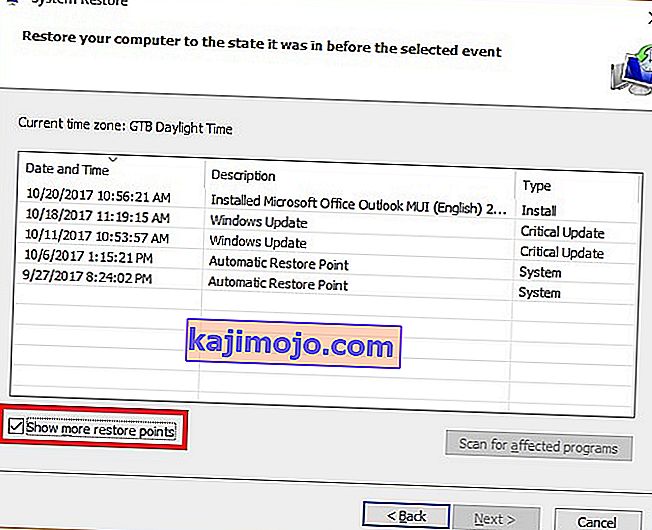
- Selectați un punct de restaurare din listă care este înainte de data la care a început să apară această problemă.
- Faceți clic din nou pe „Next” și urmați instrucțiunile de pe ecran pentru a reveni la data selectată.
- După finalizarea restaurării, verificați dacă problema persistă.


Metoda 7: Activați paravanul de protecție
În unele cazuri, este posibil ca eroarea să fie declanșată deoarece aplicația este suspectă sau cel puțin dacă a fost marcată ca suspectă și paravanul de protecție Windows nu rulează pe computerul dvs. pentru a valida acest lucru suspect. Prin urmare, în acest pas, ne vom asigura că paravanul de protecție Windows este activat pentru a scăpa de această eroare. Pentru asta:
- Apăsați „Windows” + „R” pentru a deschide solicitarea Run.
- Tastați „Panou de control” și apăsați „Enter” pentru a lansa interfața clasică a Panoului de control.
- In the Control Panel, click on the “ViewBy:” option and select the “Large Icons” button.
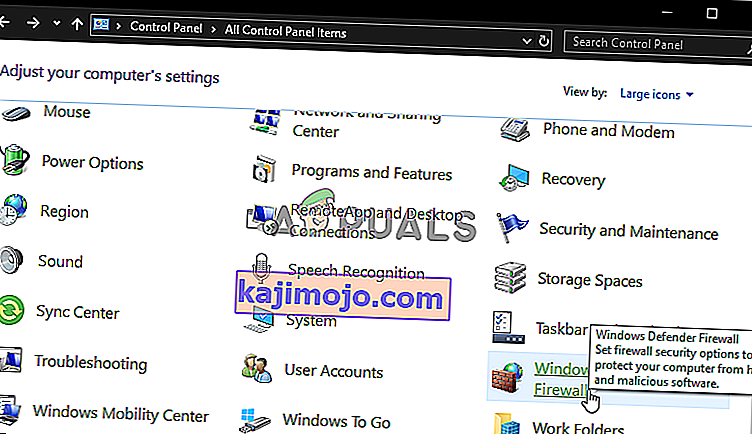
- After making this selection, click on the “Windows Defender Firewall” option to launch the Firewall and then select the “Turn Windows Defender Firewall On or Off”.
- Make sure to check the “Turn on Windows Defender Firewall” for both the available options to turn the Firewall on.
- After making this selection, save your changes and close out of the Window.
- After doing so, check to see if the issue still persists.


Method 8: Run SFC Scan
In some situations, you might’ve installed a bad driver on your computer or at some point, due to a storage failure, some system files or drivers might’ve been corrupted. Therefore, in this step, we will be running a complete system scan to identify any drivers that are missing signatures or to fix any abnormalities in the system files. For that:
- Press “Windows’ + “R’ to open the Run prompt.
- Type in “cmd” and then press “Shift’ + “Ctrl” + “Enter” to provide admin permissions.Running the Command Prompt
- Type in the following command inside the command prompt and press “Enter” to execute it.
sfc /scannow
- Let the computer scan for any broken or corrupted items and it should automatically replace them with working ones.
- Check to see if doing so fixes the error message.

Method 9: Disabling Data Execution Prevention
Data Execution Prevention is a program that prevents certain programs or executables from being able to run on your computer because it suspects that they might be viruses. Due to this prevention, sometimes, as a false alarm, legit applications might also face issues while trying to run on your computer. Therefore, in this step, we will be disabling this setting from the system configuration panel. For that:
- Press ‘Windows’ + “R’ to open the Run prompt.
- Type in “Control Panel” and press “Enter” to launch the classical control panel interface.

- Inside the Control Panel, click on the “View By:” icon and then select the “Large Icons” option.
- After selecting Large Icons, select the “System” option.
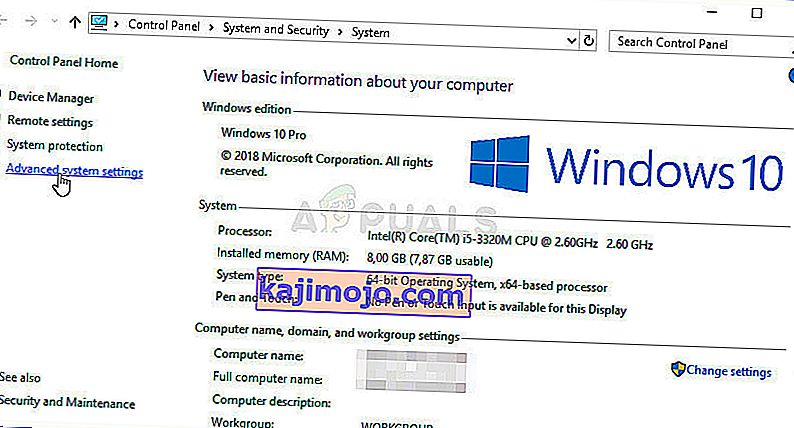
- Click on the “Advanced System Settings” option on the left side of the screen.
- In the advanced System Settings, click on the “Advanced” tab from the top.
- In the advanced tab, click on the “Settings” option under the “Performance” heading.
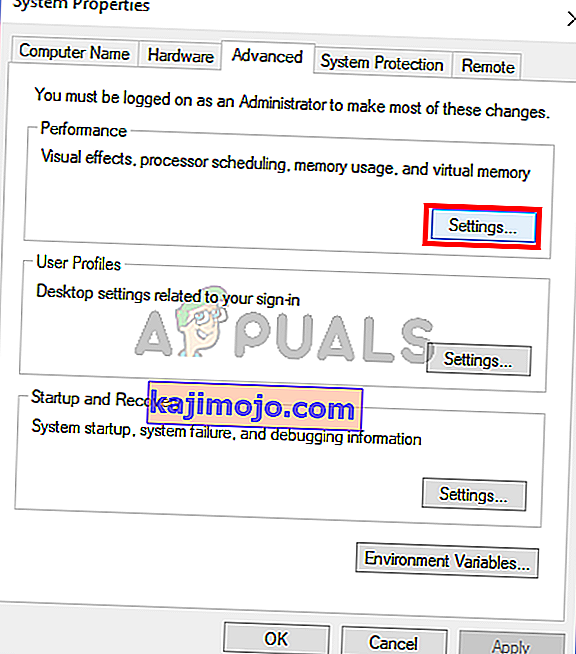
- On the next window that opens up, click on the “Data Execution Prevention” tab, and then select the “Turnon DEP for all programs except thoseI Select” option.
- After that, click on the “Add” option and point to the executable of the application that you are facing issues with.
- This way, that application will no longer come under the jurisdiction of the DEP program.
- Check to see if doing so has fixed the issue.


If the above process is unable to fix the issue, it might be because the executable isn’t the only one being affected by the DEP program. Sometimes the DEP might actually be preventing a herd of executables from being run on the computer and to counter this we will be disabling DEP completely.
Disabling DEP completely cannot be done through any Windows setting and it needs to be done manually through the command prompt. Remember to take this step as a last resort because this can in some cases makes your computer more vulnerable to viruses and malware attacks. In order to disable DEP through the command prompt:
- Press “Windows” + “R’ to open the Run prompt.
- Inside the Run prompt, type in “cmd” and then press “Shift” + “Ctrl” + “Enter” to launch in admin mode.
- Inside the command prompt, type in the following command and press “Enter” to execute it on your computer.
bcdedit.exe /set {current} nx AlwaysOff - Once the command has been executed, run the application that you want to and check to see if the error message still persists.
Method 10: Disable Firewall and Windows Defender
In some situations, the executable that you want to run on the computer might actually be blocked by the Firewall and it would not be able to make contact with its servers this way. Therefore, we will have to allow the executable in our Firewall for both public and private networks which should get it working if the Firewall is preventing it.
In addition to that, sometimes the Windows Defender might prevent the application from running on your computer because its local files might be suspicious and not properly signed. This can be due to a false alarm as well so we will be disabling the Windows Defender for the application as well by adding an exclusion. In order to do that:
- Press “Windows” + “R” to launch the Run prompt.
- Type in “ControlPanel” and press “Enter” to launch the classical control panel interface.
- Click on the “View by:” button, select “Large Icons” and then click on the Windows Defender Firewall option.
- Select the “Allow an app orfeature through the Firewall” button on the left pane and then click on the “Change Settings” button and accept the prompt.
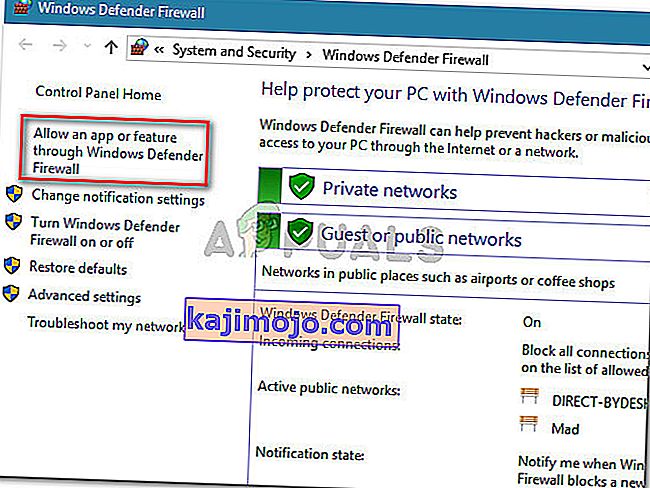
- From here, make sure that you check both the “Public” and the “Private” options for the application and its entries.
- Save your changes and exit out of the window.
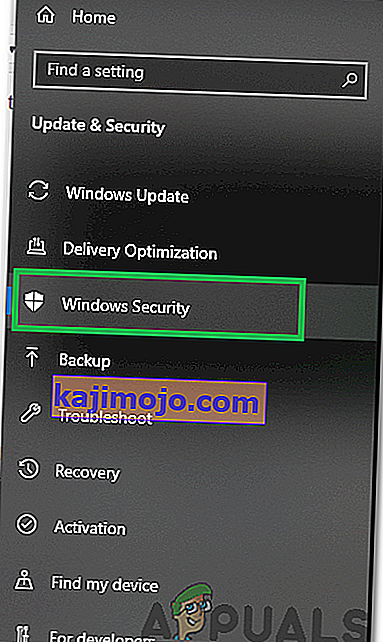
- After that, press “Windows” + “I” to launch the settings and click on the “Updateand Security” option.
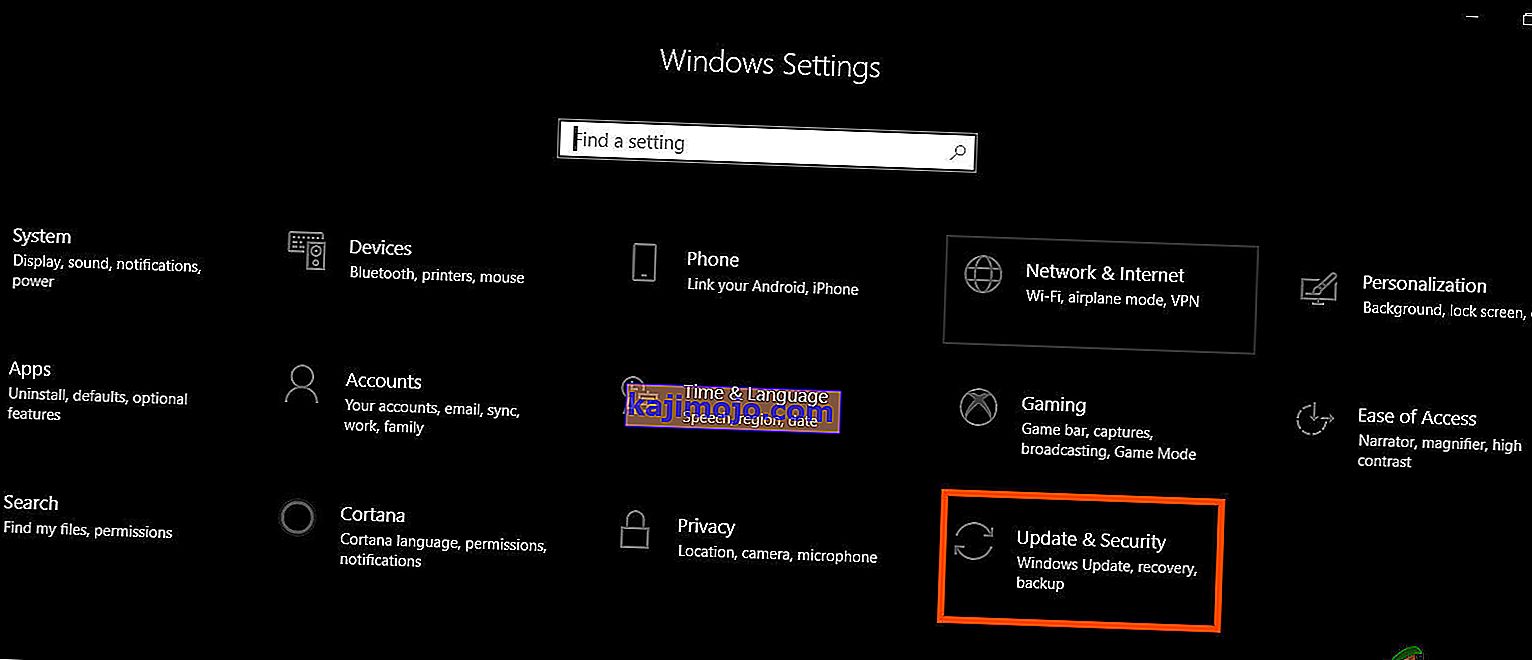
- From the left pane, click on the “Windows Security” button and then click on the “Virus and Threat Protection” button.
- Select the “Manage Settings” button under the Virus and Threat Protection Settings heading.
- Scroll down and click on the “Add or Remove Exclusions” button in the next window.
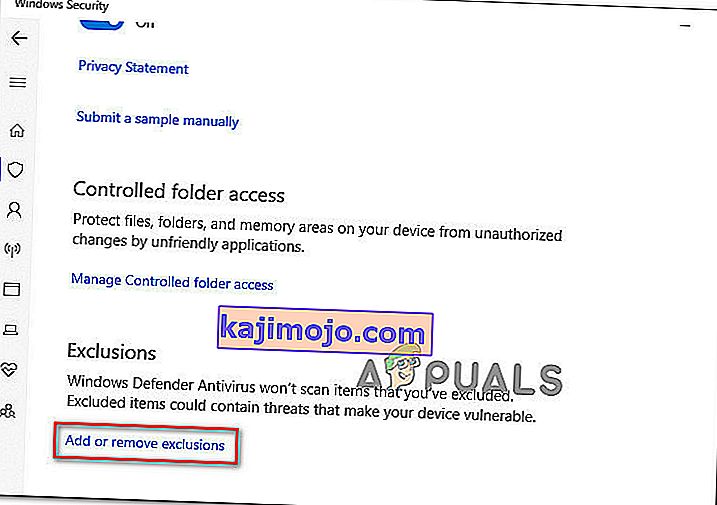
- Click on the “Add an Exclusion” option and select “Folder’ from the File type.
- Make sure to specify the application’s folder with which the issue is occurring and exit out of this window after saving your changes
- Check and see if doing so has fixed the error message.


Method 11: Reinstall Firefox
If you are getting this error while trying to launch Firefox, it might be occurring because the applications haven’t been installed properly on your computer. Therefore, in this step, we will be launching the app management window and uninstalling Firefox after which we will reinstall it completely by downloading it from the Firefox website. For that:
- Press “Windows” + “R” to open the Run prompt.
- Type in “appwiz.cpl” and press “Enter” to open the app management window.

- In the app management window, scroll down and right-click on the “Firefox” application.
- Select “Uninstall” from the list and then follow the on-screen instructions to remove the software from your computer.
- Repeat this step for all instances and bundled applications of the software installed on your computer.
- Make sure to disable any third-party antiviruses at this point to make sure that the software is installed smoothly.
- Head on over to the Mozilla website and click on the download button.

- Click on the downloaded executable and install it on your computer following the on-screen instructions.
- Check to see if doing so has fixed the error message on your computer.


Method 12: Scanning for Malware
It is possible in some cases that the computer has acquired malware that is preventing the user from being able to run all the system functions on their computer. Therefore, in this step, we will be using the default Windows Defender to scan our computer thoroughly for any viruses or malware that might’ve found its way on our computer. For that:
- Press the “Windows” + “I” keys simultaneously on your PC to open the Settings tab.
- Navigate to the Update& Security option and then click on the “Windows Security” button on the left tab.
- After that, click on the “Open Windows Security” and select the “Virus and Threat Protection” option.
- After that, click on the “Scan Options” button below the “Quick Scan” window.
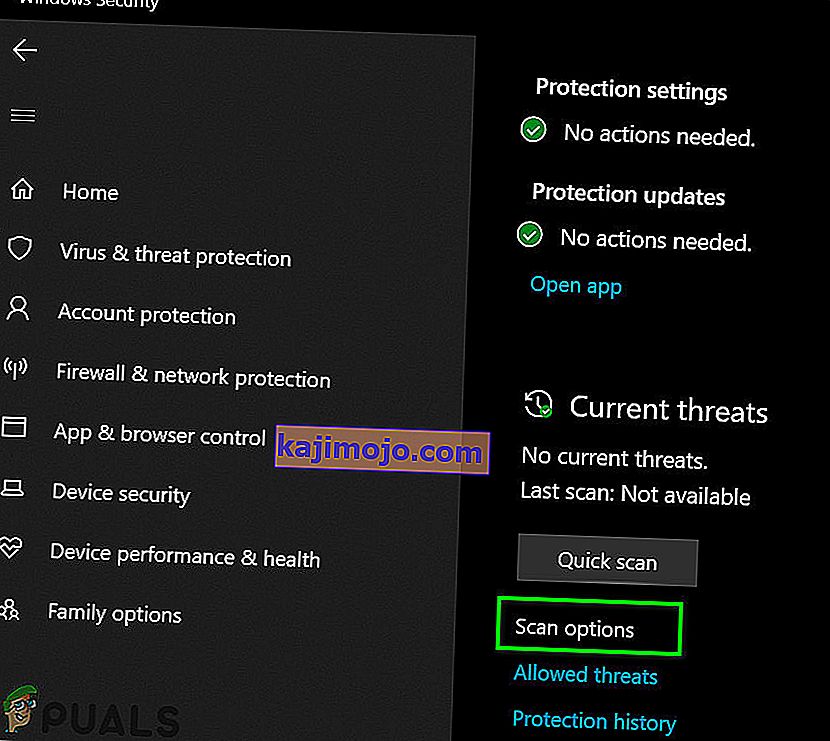
- Click on the “Full Scan” option and then hit the button of “Scan Now”.
- Wait for a few seconds while this process gets completed and then finally check if the error gets resolved now.


Microsoft Security Scanner is an additional tool that you can use to test the system for any further viruses and malware because sometimes the default tool isn’t able to perform the scan properly. Therefore, in this step, if the issue still hasn’t been resolved, we will be using the Microsoft Security Scanner to further make sure for any issues.
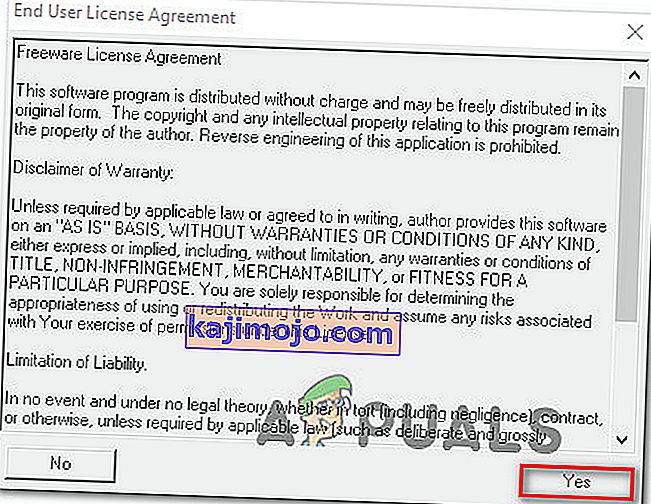
- Launch your browser and download the Microsoft Security Scanner from here.
- After downloading the executable, run it on your computer and let it install.
- Accept the License Agreement terms and click on “Next”.
- Select “Full Scan” and click on “Next”.
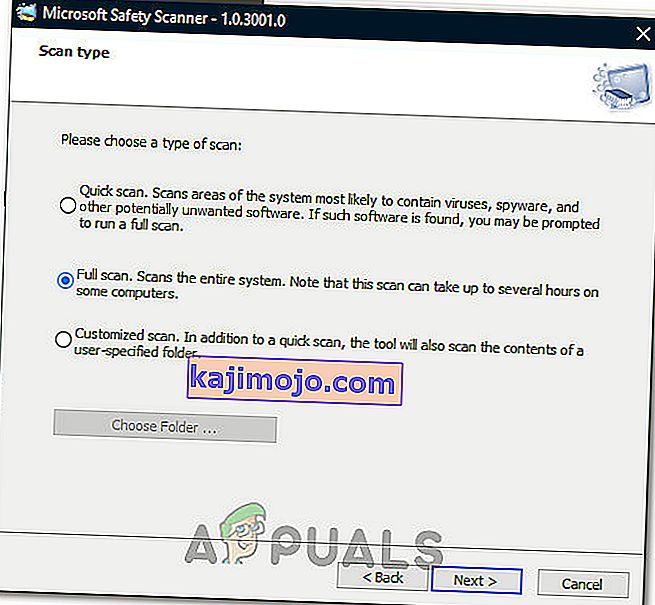
- After you opt for a full scan, the software will start scanning your entire computer to look for any malware or viruses that might’ve disguised themselves as normal executables or applications.
- After this scan has been finished, check to see if the error message still persists.


Method 13: Install Missing Drivers
It is possible in some situations that your device is missing certain drivers due to which this particular issue is being triggered on your computer. Therefore, we will be checking for any missing drivers and then we will check to see if the error is fixed. In order to do this, follow the guide below.
- Download Driver Easy on your computer.

- Run the downloaded executable and install the software on your computer.
- Run the check and see if there are any missing drivers on your computer.
- Install these missing drivers and then install them either manually or automatically using the Software.
- After installing all the missing drivers, check to see if the issue still persists.

Method 14: Reconfigure Registry
It is possible that in some cases, you haven’t properly configured all the registry settings or that you unknowingly configured something incorrectly. Therefore, in this step, we will be reconfiguring our Registry to fix a certain key that sometimes, if misconfigured, causes this particular error on Windows. In order to do this, follow the guide below.
- Press “Windows” + “R” to open the Run prompt.
- Type in “regedit” and press “enter” to launch the registry editor.

- Inside the registry editor, navigate to the following location.
HKLM\SOFTWARE\Microsoft\Windows NT\CurrentVersion\Windows\AppInit_Dlls
- Double click on the “LoadAppInit_DLLs” entry on the right side of the screen.
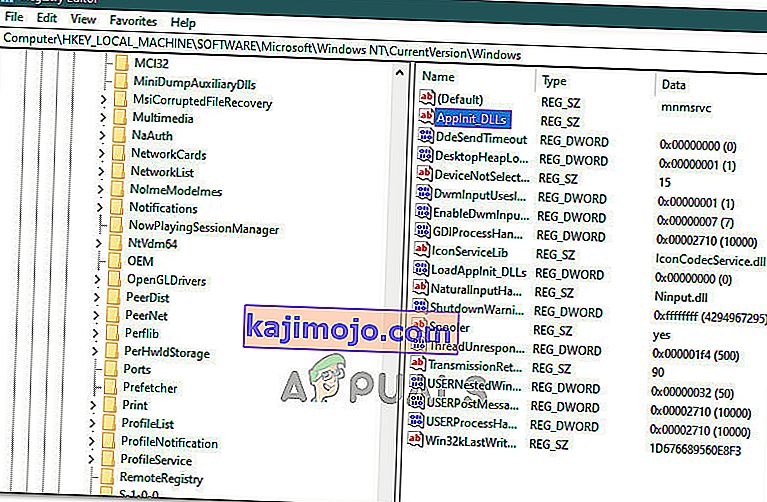
- Change the value of this registry from “1” to “0”.
- Save your changes and exit the registry editor.
- Check to see if doing so has fixed the error.


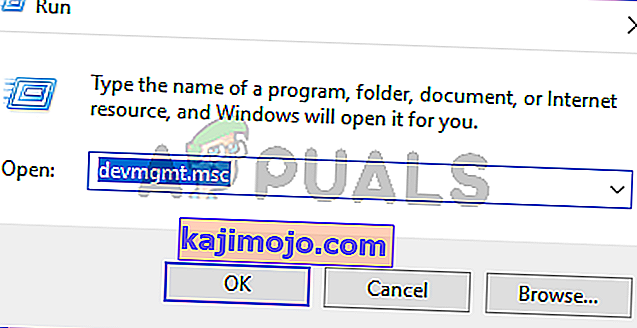
Method 15: Update Disk Drivers
In some cases, the Disk Drivers that are being used to control your Storage and other Disks installed on the computer might have been outdated due to which the error is being triggered. Therefore, in this step, we will first be opening the Device Management Window and from there, we will be updating these drivers. In order to do so, follow the steps mentioned below.
- Press “Windows’ + “R” to open the Run prompt.
- Type in “Devmgmt.msc” and press “Enter” to launch the device management window.
- In the Device Manager, double click on the “DiskDrives” option to expand it.
- Right-click on the storage device listed and select the “Update Driver” option.
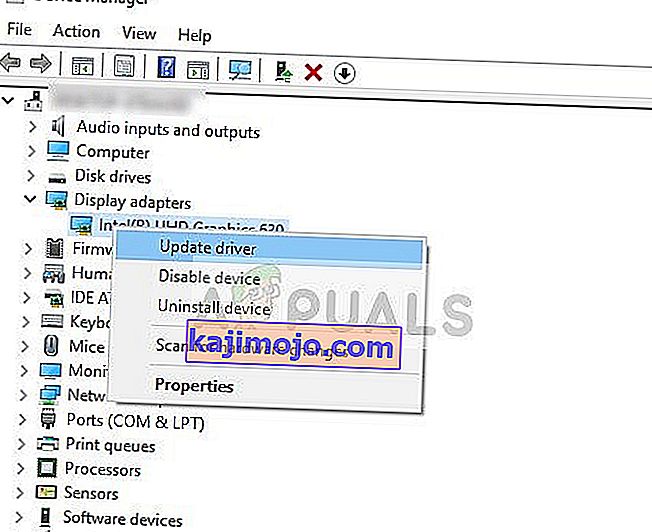
- Select the “Search Automatically for Drivers” option and let the setup search.
- If there are any drivers available, Windows will automatically check for them and install them on your computer.
- Check to see if doing so has fixed the issue.


Method 16: Disabling Automatic Updates and Uninstalling Updates
It is possible in some cases, that this error is stemming from a faulty update install. Microsoft is notorious for pushing out updates that aren’t properly customized to work for all hardware combinations and often go on to break things instead of making them better. Therefore we will make sure that the recent update isn’t installed on our computer.
In order to do this, we will have to first disable automatic updates on our computer and then we will be uninstalling the recently installed updates. Make sure to back up any important data that you don’t want to lose just in case this goes bad.
- Press “Windows” + “R’ to open the Run prompt.
- Type in “service.msc” and press “Enter”.
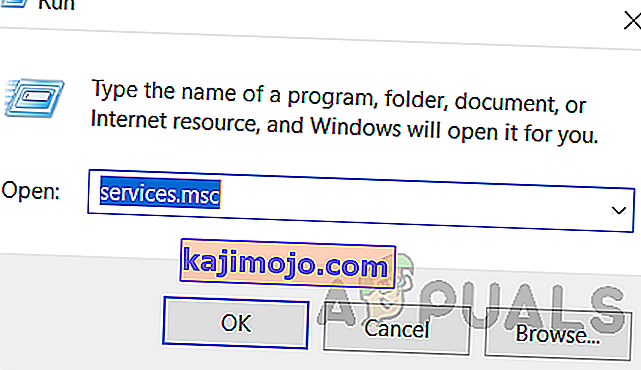
- Scroll through the list and double click on the “Windows Update” service.
- Click on the “Stop” button and then click on the “Startup Type” dropdown.
- Select “Disabled” from the list and select the “Apply” button from the window.
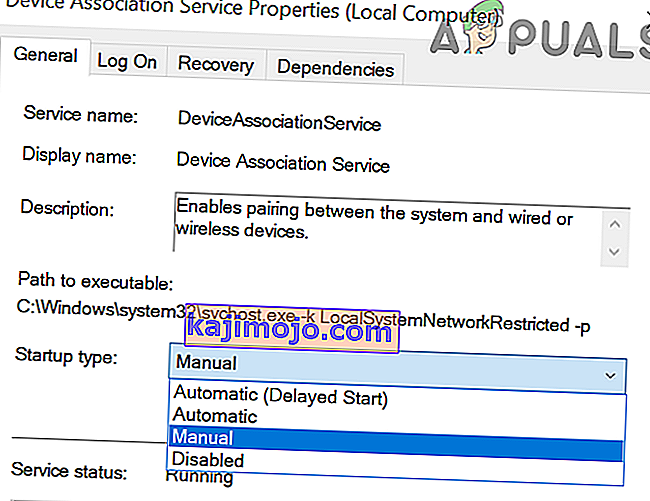
- Click on “OK” to close out of this window.
- Check to see if doing so has stopped your computer from updating.


After stopping the computer from updating, we will now be uninstalling the recent updates that have been installed on your computer. For that:
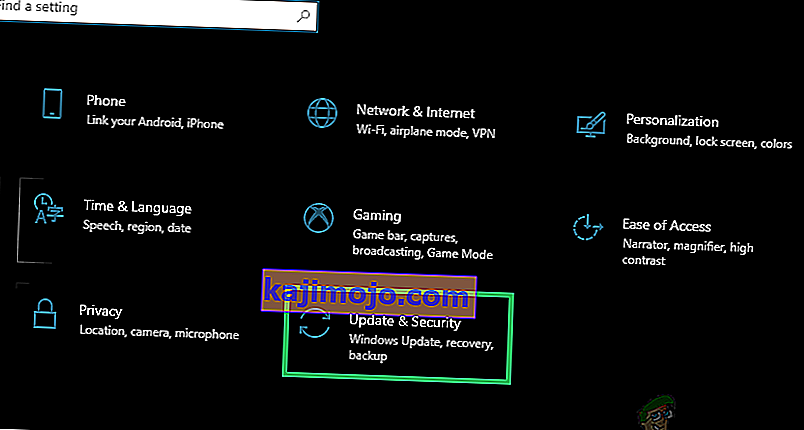
- Press “Windows” + “I” buttons to open the settings.
- In settings, click on the “Update and Security” option and then select the “Windows Update” button from the left pane.
- In the Windows Update, click on the “View Update History” option.
- In the Update History, click on the “Uninstall Updates” option and it should take you to the uninstallation screen where all the recently installed updates will be listed.
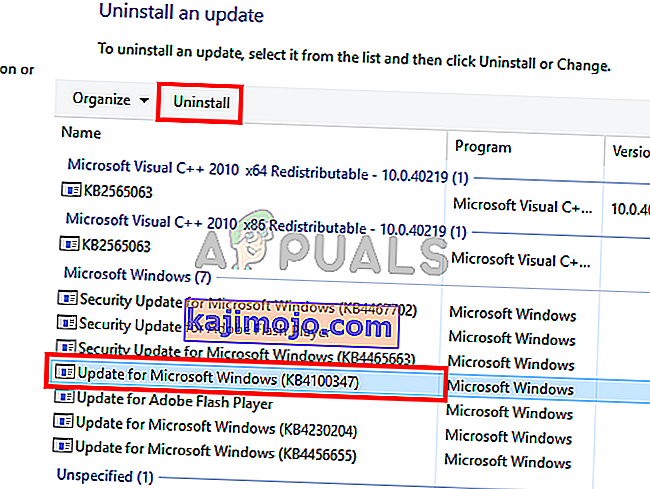
- From the list, right-click on the update that was installed recently and caused this error on your computer.
- Right-click on this update and select the “Uninstall” button to remove it completely from the computer.
- Follow through with the on-screen instructions.
- Check to see if uninstalling has fixed this issue.


Additional Fixes:
- In addition to some of the recommendations given above, you should try to check if there are any bad memory modules (RAM) installed on your computer which can be a cause of this.
- De asemenea, asigurați-vă că verificați dacă nu v-ați overclocat memoria RAM la un nivel peste limita recomandată. Dacă ați făcut acest lucru, încercați să îl readuceți la valorile implicite din fabrică și verificați dacă acest lucru vă rezolvă problema ..