Problema ecranului negru pe Windows 10 apare de obicei după o actualizare sau când o actualizare Windows automată instalează actualizări pe sistemul dvs. Deoarece acest ecran negru este cel mai probabil o problemă hardware (GPU), va trebui să evaluăm și să depanăm diferite setări pentru a o diagnostica și a o remedia.

În zilele noastre, computerele sunt din ce în ce mai avansate cu mai multe plăci grafice pentru utilizare intensă. Deci, dacă aveți o altă placă grafică decât controlerul grafic de la bordul Intel , probabil că veți avea acest boot la o problemă de ecran negru . Uneori, Windows ia acest lucru ca și cum ar fi două monitoare atașate la sistem. Deci, Windows încarcă semnalul de ieșire pe un ecran negru.
Înainte de a intra în orice depanare extinsă; trebuie să verificăm câteva setări de bază. Dacă utilizați mai multe monitoare deconectați / reconectați și testați cu ecranul principal. Dacă acest lucru rezolvă problema; esti norocos. Dacă nu continuați cu pașii de mai jos:
Metoda 1: Remediați-l orbește
Această metodă se referă la remedierea orbirii problemei, deoarece nu puteți vedea nimic pe un ecran negru.
- Când Windows se blochează pe ecranul negru, așteptați să apară cursorul alb al mouse-ului pe ecran. Puteți verifica prezența acestuia mutând mouse-ul.
- După ce cursorul a apărut pe ecran, apăsați bara de spațiu de pe tastatură și apăsați tasta Ctrl o dată pe tastatură. Introduceți parola de conectare sau codul PIN orbește (nu puteți vedea pe ecranul negru) . S-ar conecta la Windows folosind acreditările dvs.
Dacă nu puteți vedea desktopul după ce v-ați conectat la contul dvs. și sunteți blocat pe ecranul negru, apoi apăsați Win + P + Tasta săgeată în jos (de două ori) de pe tastatură și introduceți din nou detaliile.
Metoda 2: Ciclul de alimentare
Dacă este un laptop cu o baterie detașabilă de utilizator, atunci;
- Scoateți bateria.
- Deconectați adaptorul de alimentare.

- Apăsați și țineți apăsat butonul de alimentare timp de 10 secunde
- Eliberați butonul de alimentare.
- Conectați încărcătorul înapoi și încercați să îl porniți.

Testați și vedeți dacă problema este rezolvată; în caz contrar, continuați cu Metoda 4
Metoda 3: dezactivați pornirea rapidă
Windows 10 este lansat cu o funcție de pornire rapidă. După cum sugerează și numele, permite pornirea rapidă a sistemului de operare, astfel încât să vă puteți relua munca sau să vă jucați rapid.
NOTĂ: Funcția de pornire rapidă funcționează numai atunci când efectuați o oprire și apoi porniți sistemul, nu se aplică atunci când efectuați o repornire .
Pentru a dezactiva opțiunea de pornire rapidă; urmați acești pașiPorniți utilizând suportul de instalare Windows 10. Poate fi necesar să schimbați ordinea de încărcare din bios.
vezi: cum să creezi un Windows 10 media bootabil
- Faceți clic pe Reparați computerul din partea de jos
- Faceți clic pe Depanare
- Faceți clic pe Opțiuni avansate
Notă: dacă această metodă nu funcționează, încercați să faceți clic pe „Reveniți la versiunile anterioare” și urmați instrucțiunile de pe ecran.
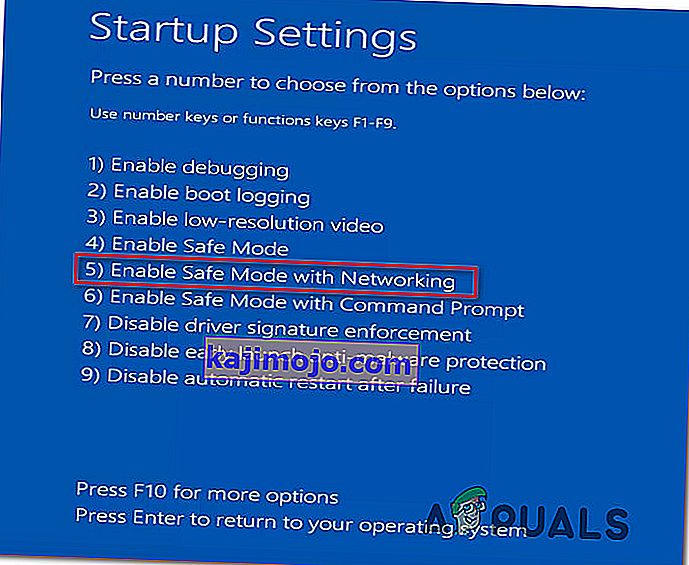
- Faceți clic pe Setări de pornire
- Faceți clic pe Repornire
- Selectați Mod sigur cu Rețea
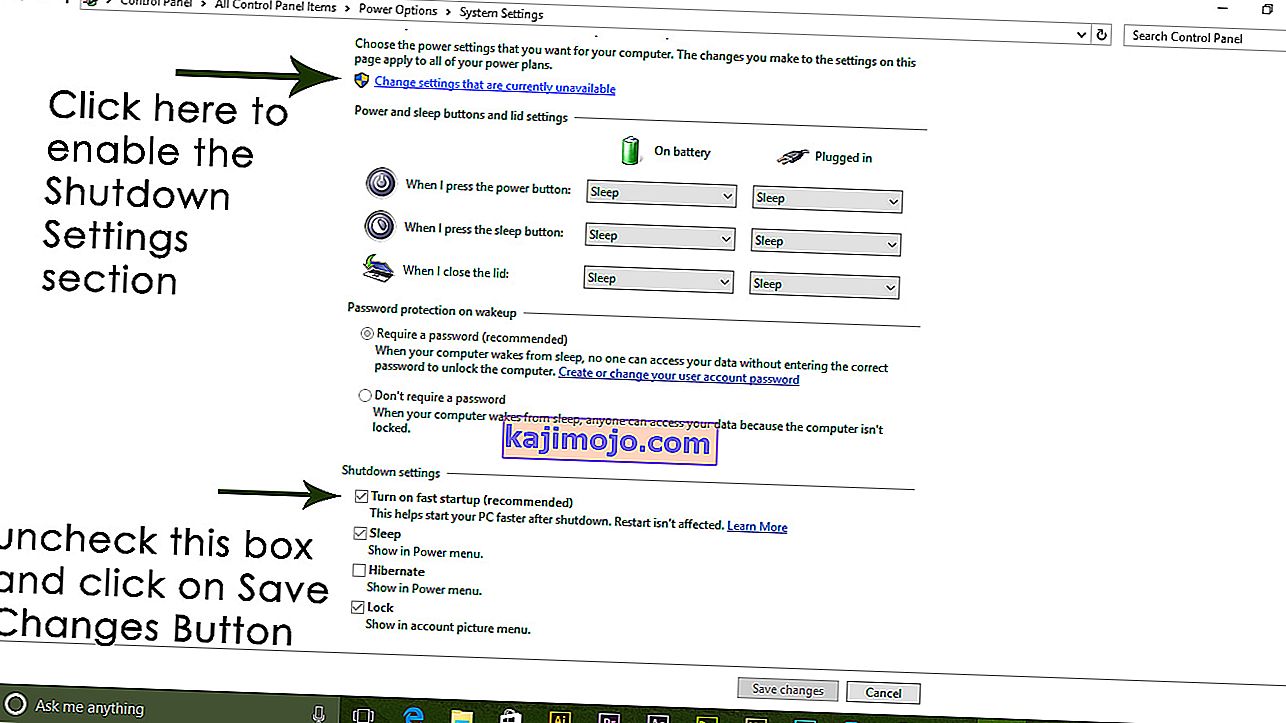
- Când computerul începe să meargă la Panoul de control ;
- Selectați Power Options ; Selectați Alegeți ce fac butoanele de alimentare în stânga dvs.


Aici, derulați în jos și găsiți opțiunea de pornire rapidă și debifați- o.
Metoda 4: Dezinstalați adaptorul de afișare
Când vedeți ecranul negru:
- Țineți apăsate tastele CTRL + ALT + DEL pentru a vedea dacă apare Task Manager. Dacă da, faceți clic pe Fișier -> Nou -> și tastați explorer.exe
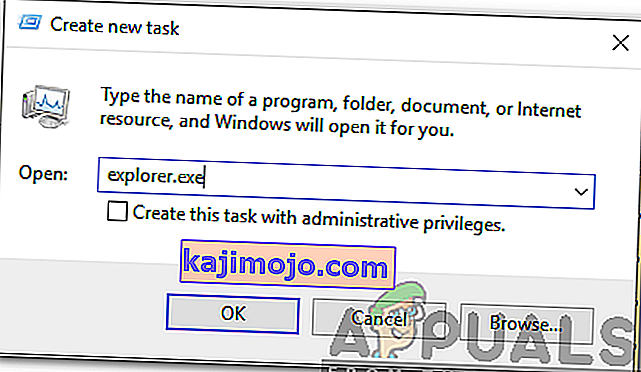
- Dacă deschide fereastra Explorer; conectați-vă și dezinstalați software-ul antivirus / placa grafică și apoi reinstalați.
Notă: puteți alege, de asemenea, să dezactivați temporar Antivirusul în loc să îl dezinstalați.
- Pentru a dezinstala adaptorul grafic / afișaj; dacă CTRL + ALT + DEL are succes și vedeți fereastra de explorare, țineți apăsată tasta Win și apăsați R
- Tastați hdwwiz.cpl și faceți clic pe OK
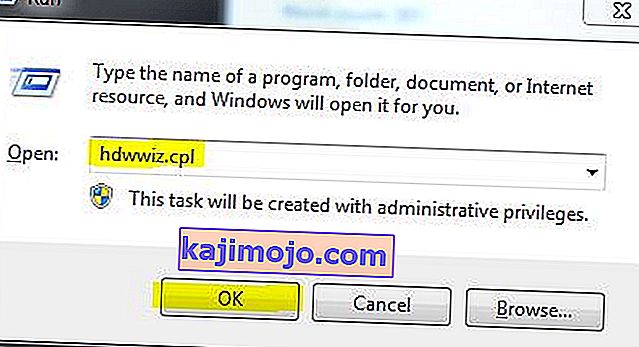
- Notați numele adaptorului de afișare;
- Extindeți adaptoare de afișare -> Selectați Dezinstalare


După ce a fost dezinstalat, accesați site-ul producătorului pentru a descărca cel mai recent driver. Reporniți și testați
Metoda 5: Restabiliți sistemul la valorile implicite din fabrică
Această metodă vă va șterge toate datele și va pune / instala sistemul de operare original furnizat împreună cu computerul. De vreme ce există corupție; și dacă datele nu sunt importante, le putem restabili la valorile implicite din fabrică, apoi efectuați o instalare curată a Windows. Este posibil ca opțiunea de upgrade să nu mai fie acolo după aceasta.
Consultați manualul sistemului pentru instrucțiuni de restaurare din fabrică.
Metoda 6: Pur și simplu reporniți computerul
Unele dintre utilizatorii de Windows 10 care au suferit de problema ecran negru în raport trecut , care pur și simplu de cotitură computerul lor oprit cu ajutorul său de putere buton și apoi pornindu - l salvați din nou a făcut truc și a scăpat de problema pentru ei. Oricât de bizar ar părea, această soluție merită cu siguranță să dai o lovitură.
Metoda 7: Actualizați driverele GPU-ului la cele mai recente versiuni ale acestora
Windows 10 is a big step up from the previous versions of Windows, which is why all GPU manufacturers had to create entirely new drivers designed specifically for the new Operating System. Not having the updated Windows 10-compatible drivers on your computer is another thing that can cause your computer to be affected by the black screen issue. If outdated drivers are behind the black screen problem in your case, all you need to do is go to the official website of your computer manufacturer or your GPU’s manufacturer and download the latest drivers for your GPU (they should be available in both locations). Make sure that the drivers you download are specifically designed for Windows 10 to ensure the success of this solution.
Method 8: Change your laptop’s plugged in brightness to anything but 100%
On laptops that had high-end graphics cards and were updated to Windows 8, the black screen issue often presents itself when they are plugged into an AC power outlet. If that is the case, simply opening the Start Menu, searching for Advanced power settings, opening Advanced power settings and changing your laptop’s screen brightness when plugged into anything except for 100% (even 99% will do) will get rid of the black screen problem.
Method 9: If you have two graphics cards, disable the onboard one
A decent fix for the black screen issue for people whose computers have tow graphics cards – the onboard graphics card that came with the computer and the graphics card that they have added to it (such as an Nvidia or AMD graphic card) – is to simply disable the onboard graphics card. Apparently, having two graphics cards on a Windows 10 computer can result in a clash that consequently gives birth to the black screen issue. If that is the case, simply going into Device Manager, expanding the Display adapters section, right-clicking on the onboard graphics card and clicking on Disable should fix the issue.
If you do not see your onboard graphics card in the Display adapters section, click on View in the top left of the Device Manager dialog and click on Show hidden devices. This will make your onboard graphics card (or, in some cases, cards) visible, and you can then right-click on it and click on Disable.
Method 10: Refresh your computer
The infamous black screen issue on Windows 10 can also be fixed by simply refreshing your computer. Refreshing your computer has almost entirely the same effect as resetting it to factory settings, with the exception of the fact that a refresh only deletes installed programs and applications and keeps your personal data whereas a reset gets rid of everything on your computer. To refresh a Windows 10 computer, you need to:
- Open the Start Menu.
- Click on Settings.
- Out of the array of different options provided, click on Update & Security.
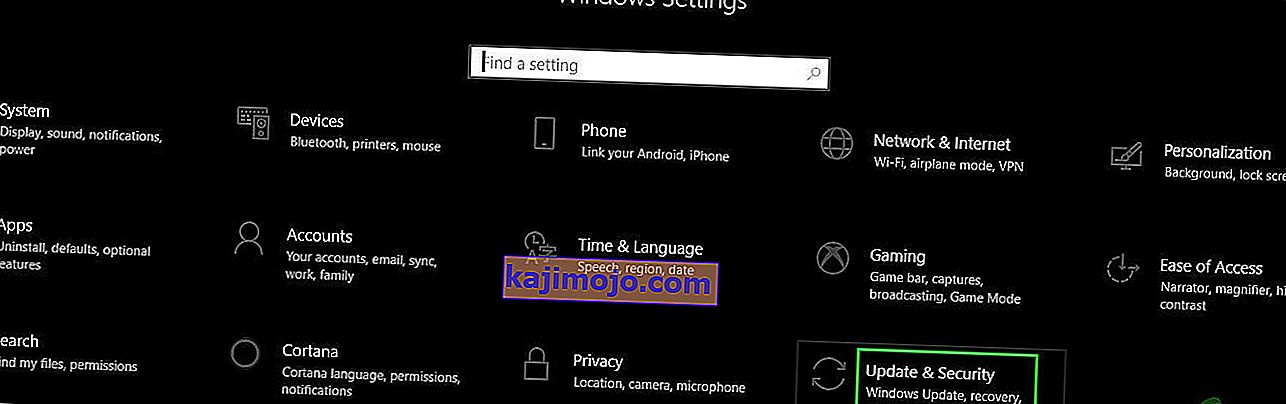
- Click on Recovery in the left pane.
- In the right pane, click on the Get started button under the Reset this PC
- When provided with a choice to either keep your files or remove everything, click on Keep my files.

Method 11: Correcting User Shell
In some cases, the User shell might be preventing the user from being able to boot safely into their computer. In certain situations, the user shell configuration inside the registry might get corrupted due to which this black screen issue can occur. Therefore, in this step, we will be correcting this user shell entry. In order to do that, follow the steps below.
- Boot your computer and wait for the black screen to appear.
- Press “Ctrl” + “Alt” + “Del” and select the “Task Manager” option.
- Click on the “File” option on the top left of the task manager and select “Run New Task” from the list.
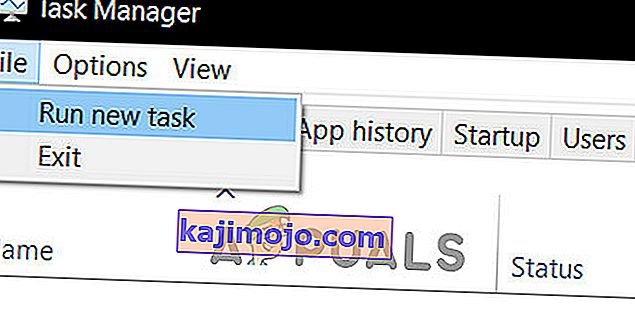
- Type in “regedit” and press “Enter” to open it.
Computer\HKEY_LOCAL_MACHINE\SOFTWARE\Microsoft\Windows NT\CurrentVersion\Winlogon
- Double click on the “Shell” entry on the right pane.
- Type in “Explorer.exe” in the Value data field and save your changes.
- Press “Ctrl” + “Alt” + “Del” again and click on the “Power Options” icon on the lower right side.

- Select “Restart” from the menu and wait for your computer to be restarted.
- Check to see if the issue persists after restarting the computer.


Method 12: Stopping Service
There is a specific service that prevents the computer from being able to function properly in some cases and stopping it can prevent the black screen issue from occurring. Therefore, in this step, we will be stopping this service. For that:
- Press “Ctrl” + “Alt” + “Del” and select the “Task Manager” option.
- Click on the “File” option on the top left of the task manager and select “Run New Task” from the list.
- Type in “services.msc” and press “Enter” to open it.
- Scroll through this list and look for the “RunOnce32.exe” or the “RunOnce.exe” entry. Also, do this same process for the “App Readiness” Service.
- Right-click on it and select “Stop”.
- Double click on it and change its startup type to “Disabled”.
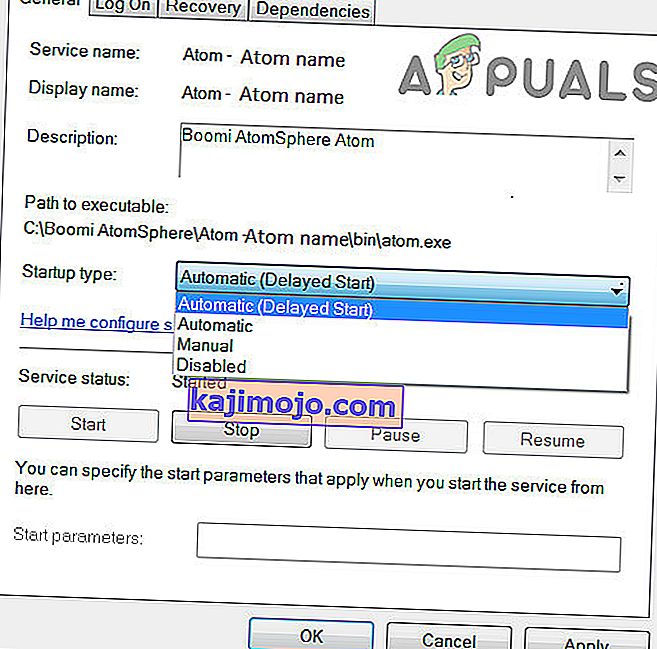
- Wait for the service to be stopped completely and restart your computer.
- Check to see if the issue persists after stopping it completely.

Method 13: Renaming Files
In certain cases, the files in some Windows’ folders might have gotten corrupted due to which this black screen issue is being triggered. Therefore, in this step, we will be renaming these files and then check to see if the issue still persists.
- Press “Ctrl” + “Alt” + “Del” on the black screen.
- Click on the “Task Manager” option and then select “File”.
- Select the “Run New Task” option and then type in “cmd”.
- Type in the following command one by one for each file to rename it.
rename “(File Path) (File Name)” “(New Name)”
- Rename the following files to anything except their original names.
C:\ProgramData\Microsoft\Windows\AppRepository\StateRepository-Deployment C:\ProgramData\Microsoft\Windows\AppRepository\StateRepository-Deployment C:\ProgramData\Microsoft\Windows\AppRepository\StateRepository-Deployment C:\ProgramData\Microsoft\Windows\AppRepository\StateRepository-Machine C:\ProgramData\Microsoft\Windows\AppRepository\StateRepository-Machine C:\ProgramData\Microsoft\Windows\AppRepository\StateRepository-Machine
- Check to see if the issue persists after making these changes.
- If it still does, try the following code to just fix it.
cd "ProgramData\Microsoft\Windows\AppRepository" ren "StateRepository-Deployment.srd" "StateRepository-Deployment-Corrupted.srd" ren "StateRepository-Deployment.srd-shm" "StateRepository-Deployment-Corrupted.srd-shm" ren "StateRepository-Deployment.srd-wal" "StateRepository-Deployment-Corrupted.srd-wal" ren "StateRepository-Machine.srd" "StateRepository-Machine-Corrupted.srd" ren "StateRepository-Machine.srd-shm" "StateRepository-Machine-Corrupted.srd-shm" ren "StateRepository-Machine.srd-wal" "StateRepository-Machine-Corrupted.srd-wal"
- Check to see if the issue persists.
Method 14: Replacing Profile Cache
It is possible the Profile cache for your current user account has either gone missing from some locations or it has been corrupted in certain locations due to which this issue is being triggered. Therefore, in this step, we will be replacing this profile cache after copying it from a location. For that:
- Create a new user account before doing so and log into that.
- Restart your computer in safe mode.
- Log in to your new profile.
- Navigate to the following location and copy the folder named “caches”.
C:\Users\{working-user-profile-name}\AppData\Local\Microsoft\Windows\Caches - Paste this folder in the following location.
C:\Users\{broken-user-profile-name}\AppData\Local\Microsoft\Windows\Caches. - Check to see if the issue persists.
Follow the onscreen instructions and dialogs, and once you are done, your computer will have been refreshed and the black screen issue will be no more.
You can further try to:
- Boot your computer in safe mode and check if the issue persists over there. This will help you to isolate these issues from a specific app that is causing it.
- Press “Windows” + “P” to switch displays that might fix this.
- Update your Bios
- Disconnect the Second monitor
- Try to use an HDMI cable for connection instead of a DVI or VGA one.
- When in the black screen, press the “Windows’ + “Ctrl” + “Shift” + “B” keys to refresh the Graphics Driver.
- You can also try to perform a Startup Repair.
- Try to create a new user account using the last methods listed in this article.
- Efectuați o scanare SFC și DISM.