Nord VPN este unul dintre vechii jucători din lumea VPN, iar aplicația sa Windows este considerată printre cele mai bune din lumea computerelor. Nord VPN este foarte diversificat dacă este vorbit în termeni de funcționalitate și flexibilitate. În plus față de suportul pe mai multe platforme, acesta are, de asemenea, diferite servere situate în diferite țări din care puteți alege.

În ciuda faptului că aplicația a fost pe piață de destul de mult timp, utilizatorii raportează că nu se pot conecta la Nord VPN. Fie se oprește conectarea după o actualizare potențială, fie cererea către serverele DNS fie returnează un răspuns „expirat”.
Ce face ca Nord VPN să nu se conecteze?
Deoarece un VPN folosește întreaga arhitectură de internet a unui sistem de calculatoare, există mai multe motive pentru care VPN-ul dvs. Nord ar putea să nu se poată conecta corect. Unele dintre acestea sunt enumerate mai jos.
- IPv6: Se pare că Nord VPN nu acceptă protocolul IPv6 în niciuna dintre comunicațiile sale. Deci, dacă acest lucru este activat, este posibil să nu vă puteți conecta.
- Programe terță parte: se știe că programele terță parte intră în conflict cu sistemul software și concurează pentru resurse; prin urmare, determinând-o să nu se conecteze corect.
- Adaptor de rețea: Deoarece Nord folosește un adaptor de rețea separat pentru a comunica cu internetul, poate fi cazul în care adaptorul de rețea nu funcționează corect și trebuie să îl reporniți.
- Eroare în rețea: uneori, configurațiile de rețea de pe computerul dvs. ar putea fi într-o stare de eroare care nu provoacă deloc conectivitate. Putem încerca să reîmprospătăm toate variabilele în acest caz.
Înainte de a începe cu soluțiile, trebuie să vă asigurați că internetul dvs. funcționează efectiv . Dacă internetul dvs. nu funcționează corect, Nord nu va putea stabili o conexiune adecvată și vă va oferi acces la o rețea tunelată.
Asigurați-vă că utilizați o rețea privată (nu școală, serviciu sau locuri publice, cum ar fi spitale) și că nu sunt implicați proxy. După ce ați verificat de două ori dacă internetul dvs. funcționează bine, continuați.
Soluția 1: Dezactivarea IPv6
IPv6 (Internet Version Protocol 6) este cea mai recentă versiune de IP din arhitectura de rețea a unui computer. În mod implicit, folosim în continuare IPv4 și încă nu am trecut la IPv6 permanent. Cu toate acestea, ar putea fi unii dintre voi care au început să utilizeze IPv6 pentru conectivitate la internet. Se pare că IPv6 nu funcționează corect cu Nord VPN. Prin urmare, îl vom dezactiva și vom verifica din nou.
- Faceți clic dreapta pe pictograma de rețea prezentă în bara de activități și selectați Deschideți setările de rețea și Internet . Acum faceți clic pe opțiunea Schimbați opțiunile adaptorului din setări.

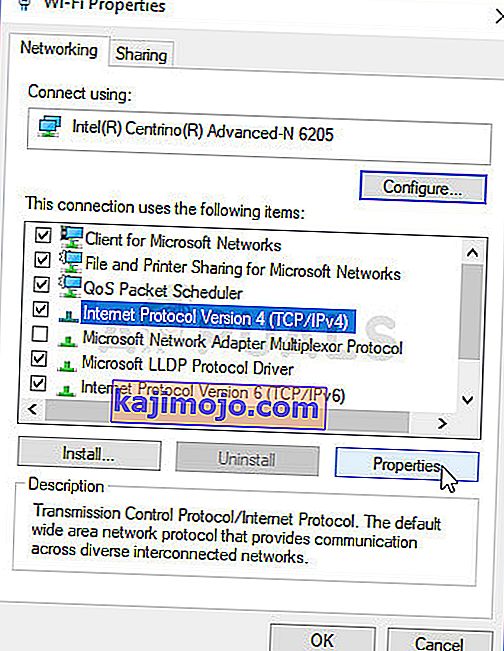
- Odată ajuns în setările adaptorului, faceți clic dreapta pe adaptorul pe care îl utilizați și selectați Proprietăți .
- Odată ajuns în proprietăți adaptor, debifați IPv6 opțiunea și asigurați - vă că IPv4 este activat. Salveaza schimbarile si iesi. Acum reporniți computerul și verificați dacă eroarea este rezolvată și vă puteți conecta la Nord VPN.

Soluția 2: Verificarea aplicațiilor terță parte
Există numeroase alte aplicații și programe care par să intre în conflict cu Nord VPN în funcționarea sa. Dacă există mai multe aplicații care încearcă să acceseze o resursă, va exista o condiție de cursă și acestea nu vor funcționa așa cum era de așteptat.

Ar trebui să afișați managerul de activități (Windows + R și „taskmgr”) și să verificați toate aplicațiile care rulează în fundal. O astfel de aplicație despre care se știa că cauzează probleme a fost Glasswire Elite . Asigurați-vă că fie îl dezinstalați, fie asigurați-vă că este dezactivat atunci când încercați să vă conectați cu Nord VPN.
Notă: Puteți încerca, de asemenea, să curățați computerul. Aceasta va dezactiva toate aplicațiile terțe externe și va lansa doar cele necesare. Acum puteți încerca să stabiliți o conexiune. Dacă aveți succes, înseamnă că a existat o aplicație care a cauzat problema. Puteți lucra înapoi activând fiecare aplicație și verificând din nou.
Soluția 3: Schimbarea locației serverului
Nord VPN oferă utilizatorilor posibilitatea de a-și selecta locația serverului. Aceste servere sunt împrăștiate în întreaga lume și oferă conectivitate în funcție de locația lor geografică, adică un server mai aproape de dvs. este așteptat să fie mai rapid. Vom încerca să schimbăm locația serverului pe care încercați să îl conectați și vom vedea dacă acest lucru rezolvă problema neconectării.
- Lansați Nord VPN și faceți clic pe antetul Servere prezent în partea de sus a aplicației.

- Acum selectați un alt server decât înainte și după selectare, încercați să declanșați din nou VPN. Dacă aveți același comportament, încercați să alegeți un alt server și testați rețeaua pe un alt site web.
Soluția 4: Repornirea adaptorului de rețea / TAP
Nord VPN creează un adaptor de rețea virtual pe computerul dvs. pe care îl poate folosi pentru a comunica informații. Acționează ca un pod în care Nord VPN modifică setările, astfel încât să poată iniția și menține o conexiune VPN. Uneori, acest lucru se întâmplă într-o stare de eroare, determinându-vă să nu vă conectați la serverul VPN. Vom reporni adaptorul în mod corespunzător, ceea ce ne va asigura că toate configurațiile acestuia sunt reinitiate.
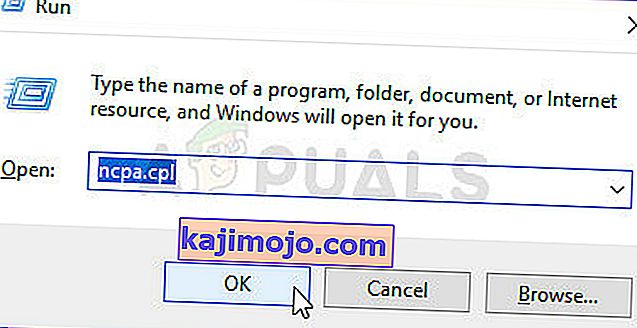
- Apăsați Windows + R, tastați „ ncpa. cpl ”în caseta de dialog și apăsați Enter.
- Toate adaptoarele de rețea vor fi listate în fața dvs. Selectați adaptorul TAP, faceți clic dreapta pe el și selectați Dezactivare .

- După dezactivarea acestuia, așteptați un minut. Apoi faceți clic dreapta din nou pe acesta și selectați Activați . Acum încercați să conectați Nord VPN și să vedeți dacă acest lucru face truc.
Soluția 5: Flushing Network Stack
Există nenumărate exemple în care spălarea (reîmprospătarea) stivei de rețea de pe computerul dvs. rezolvă diferite probleme legate de VPN (inclusiv Nord). Acest proces va spăla setările DNS și IP și se va asigura că nu există setări necorespunzătoare care ar putea intra în conflict cu aplicația.
- Apăsați Windows + S, tastați „prompt de comandă” în caseta de dialog, faceți clic dreapta pe aplicație și selectați Run as administrator .
- Odată aflat într-un prompt de comandă ridicat, executați următoarele comenzi una câte una urmate de tasta Enter după fiecare comandă:
ipconfig / release ipconfig / flushdns ipconfig / renew netsh winsock reset netsh interface ipv4 reset netsh interface ipv6 reset netsh winsock reset catalog netsh int ipv4 reset reset.log netsh int ipv6 reset reset.log

- Now close the command prompt and try launching Nord VPN again. Check if you can connect with it properly.
Solution 6: Reinstalling Nord VPN (along with the TAP adapter)
If all the above methods don’t work, you need to make sure that your Nord installation is proper and there is nothing wrong with the installation files. The TAP adapter will also be reinstalled in the process because Nord VPN manages the adapter and it is only for its use. Make sure that you are logged in as an administrator. If reinstalling doesn’t work, make sure that your credentials are correct which you are entering the services have not expired.
- Press Windows + R, type “appwiz.cpl” in the dialogue box and press Enter.
- Once in the application manager, search for the entry Nord VPN from the list, right-click on it and select Uninstall.

- Now restart your computer and download the application again from Nord VPN’s official website. Now after entering your credentials, try connecting again and check if you can establish the VPN connection correctly.
Solution 7: Using an Alternative VPN Service
There are numerous VPN clients out there in the Windows market. However, we recommend or readers to try CyberGhost. This VPN service is as simple as it gets and also provides you with servers located at different countries. It even has separate VPN servers for streaming Netflix and BBC with ease. Follow the steps below to download the application and get your connection secure in no time.
- Download CyberGhost from (here).

- After downloading the VPN, install it on your computer. You might be asked for proper permissions. Make sure that you are logged in as an administrator and press Yes to all the permissions asked.
- After CyberGhost is installed on your computer, launch it. Here you will see a list of different servers available along with the distance from your actual location (more distance means slower internet).

- After selecting the server, click on the power button present at the right-hand side of the application. You can also select dedicated servers for torrenting and streaming (present at the left navigation pane).
Solution 8: Disable Firewall
In some cases, the default Windows Firewall might be preventing the application from working properly. Therefore, in this step, we will first be allowing it through the Firewall and make sure that it isn’t blocked by the Firewall and then we will also make sure that Windows Defender has it added as an exception. For that:
- Press “Windows” + “R” to launch the Run prompt.
- Type in “ControlPanel” and press “Enter” to launch the classical control panel interface.

- Click on the “View by:” button, select “Large Icons” and then click on the Windows Defender Firewall option.
- Select the “Allow an app orfeature through the Firewall” button on the left pane and then click on the “Change Settings” button and accept the prompt.
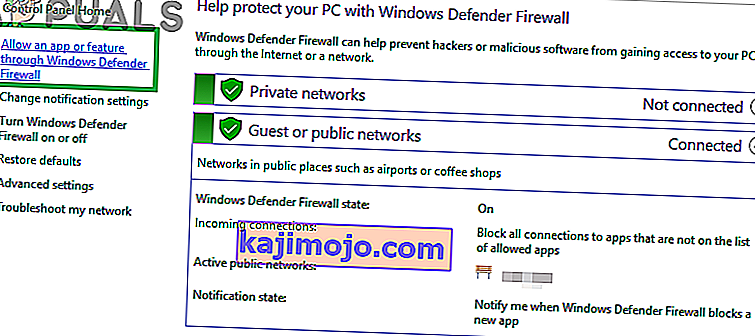
- From here, make sure that you check both the “Public” and the “Private” options for Nord VPN and its related applications/drivers.
- Save your changes and exit out of the window.
- After that, press “Windows” + “I” to launch the settings and click on the “Updateand Security” option.
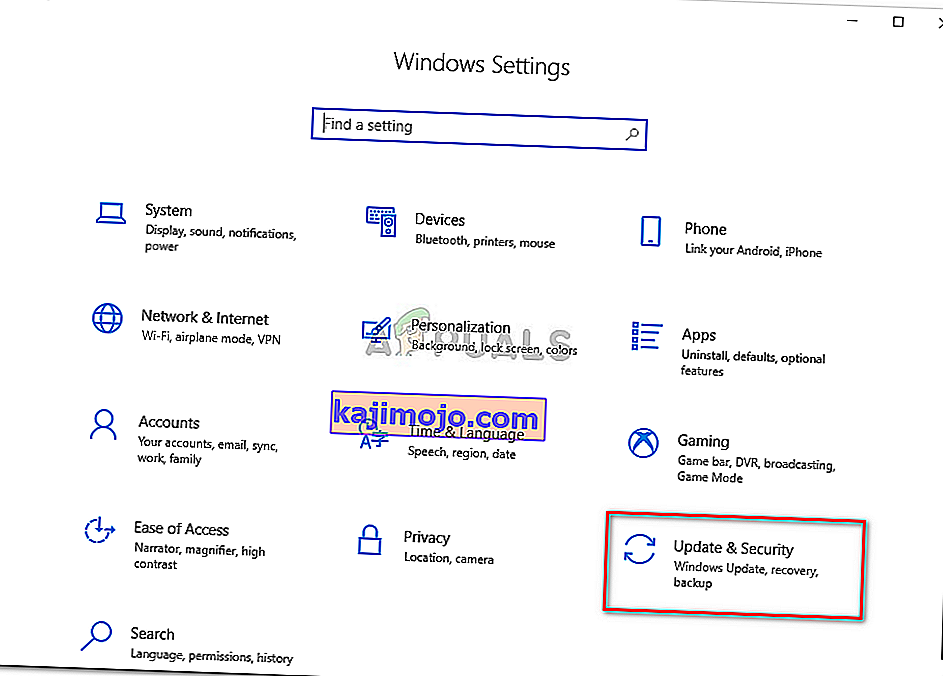
- From the left pane, click on the “Windows Security” button and then click on the “Virus and Threat Protection” button.
- Select the “Manage Settings” button under the Virus and Threat Protection Settings heading.
- Scroll down and click on the “Add or Remove Exclusions” button in the next window.
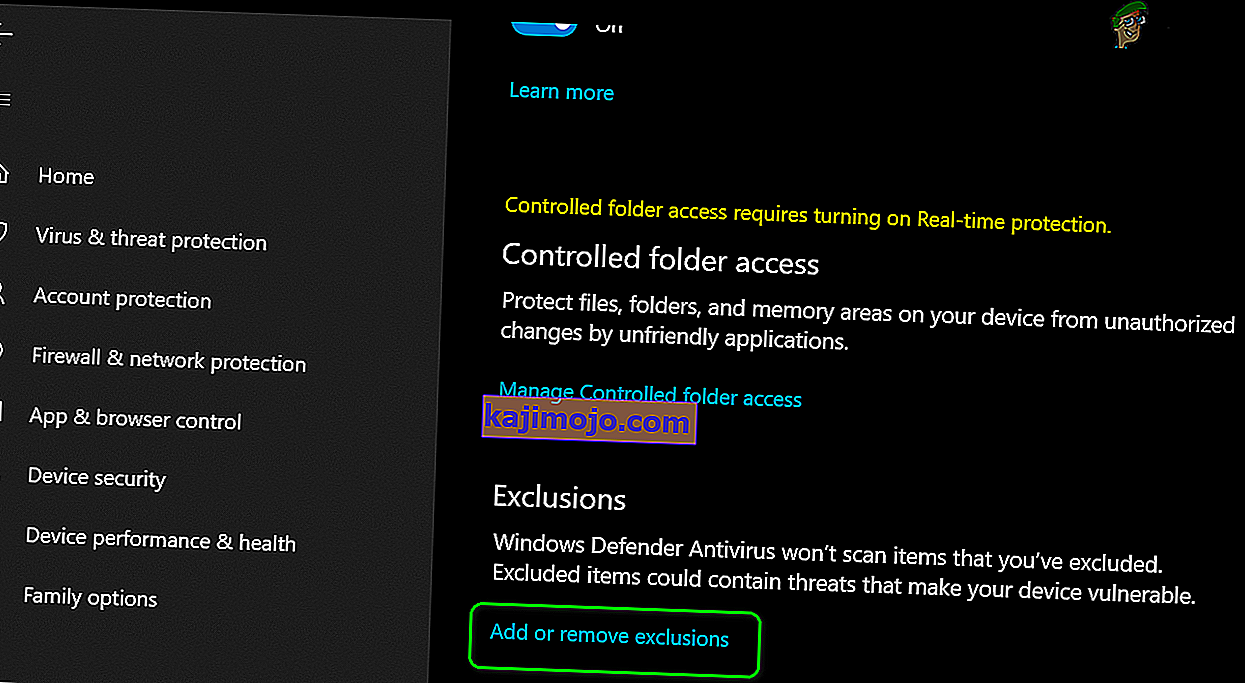
- Click on the “Add an Exclusion” option and select “Folder’ from the File type.
- Make sure to specify the Nord VPN folder and exit out of this window after saving your changes
- Check and see if doing so has fixed the issue with Nord VPN not connecting.


Solution 9: Change NordVPN Protocol
It is possible that Nord VPN might be running into issues while trying to connect to its servers due to the protocol configuration in its settings. If one type of protocol isn’t working for you, it is always recommended to try and switch to the other protocol to make sure that the issue isn’t tied to the wrong selection of the protocol type automatically or manually. For that:
- Launch NordVPN and make sure to disconnect from any currently active sessions.
- Click on the “Gear” icon on the top right corner and go into the settings.
- Click on the “Advanced” option from the left-hand side menu.
- Click on the “Protocol” dropdown and check on “TCP”.
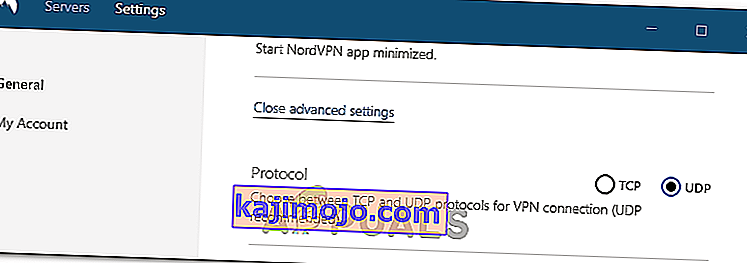
- This should change your protocol from TCP to UDP.
- Check to see if doing so fixes the issue for your computer.
- To Verify that none of the protocols work, make sure to repeat the steps and select “UDP” instead of TCP and then check again.
- If none of the selected protocols are able to make a connection with the server, move on to the other fixes.

Solution 10: Changing DNS Server Configuration
DNS Servers are used by the computer to establish a stable and secure internet connection with other sites on the internet, however, if the computer is unable to detect the DNS settings properly, or if the selected DNS server is facing outage, Nord VPN might not connect properly. Therefore, in this step, we will be changing the DNS configuration to ensure that DNS isn’t an issue. For that:
- Press “Windows” + “R” to launch the Run prompt.
- Type in “ncpa.cpl” and press “Enter” on the keyboard to launch the network configuration panel.
- Right-click on your internet connection and select the “Properties” option.
- Double click on the “Internet Protocol Version4 (TCP/IPV4)” option and check on the “Use the following DNS addresses” button.
- At first, type in “8.8.8.8” and “8.8.4.4” in the primary and the secondary DNS addresses field respectively and click on “OK”. After that, check to see if NordVPN is connecting, if it isn’t, try to use “103.86.96.100” and “103.86.99.100” in the primary and the secondary fields respectively.
- Check to see if you are able to make a connection by selecting those DNS servers.


Solution 11: Opening Ports
For some people, the issue might arise if the ports that NordVPN uses to communicate with its servers are being blocked by your router. For security reasons most routers often block ports used by VPN/Network Tools to prevent any alterations to your connections and if that is the case, we will have to open the ports by logging in to the router’s control panel. For that:
- Press “Windows” + “R” to launch the Run prompt and type in “cmd” and then press “Ctrl” + “Shift’ + “Enter” keys on your keyboard to provide admin permissions.

- Type in the following command in the command prompt to list the IP information.
ipconfig /all
- The computer will list all the information of the network adapters connected to your computer.
- Under the default gateway option, after the mac address, there should be an IP address that should look something like “192.168.x.x”.
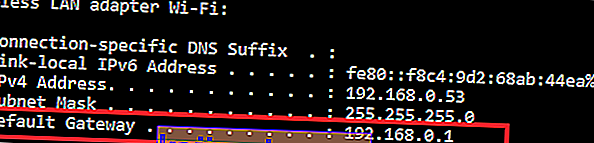
- Copy this IP address and launch your browser.
- Paste the IP address within a new tab on the browser and press “Enter” to navigate to the browser’s login page.
- Once on the login page, log into the control panel with your credentials, both of which, i.e the username and password should be written on the back of your internet router. If not, then the username should be admin and the password should be the Wifi password that you use to connect your devices.
- After logging into the Control panel, look around for a “NAT” or “Port” option that allows you to forward ports.
- Type in “500” and select “UDP” from the list.
- Click on “Save” to forward the 500 UDP port and exit out of the control panel after the change has been made.
- Try connecting with Nord VPN and check to see if the issue persists.


Solution 12: Use Hotspot
Mostly, this error can be fixed simply by employing your mobile’s hotspot connection instead of the Wifi or the Wired connection that you are already using on your computer. This does seem an inconvenience for Data conscious people but it seems to be the only way some people are able to connect through Nord VPN as some routers block it completely.
Note: In addition to this, you can try to change the firmware on your router to avoid any permanent blocks put from the router or to eliminate any bugs with the connection.